-
Ever wanted an RSS feed of all your favorite gaming news sites? Go check out our new Gaming Headlines feed! Read more about it here.
Plastic Scale Modelling |OT| Gunpla and Everything Else
- Thread starter erd
- Start date
You are using an out of date browser. It may not display this or other websites correctly.
You should upgrade or use an alternative browser.
You should upgrade or use an alternative browser.
Solid work as always. Surprised paint made it more loose. Did you try using super glue and stiffen them?
Say, hows the rg Tallgeese? It's a pretty cool looking suit with a unique style
I heard here that it's amazing.
OP
OP
Thanks. I think the problem with the joints loosening is just because of how the kit is designed. Specifically, this part:Solid work as always. Surprised paint made it more loose. Did you try using super glue and stiffen them?

The joint in the knees is just this small polycap and it has to carry the entire weight of the kit, which means it needs to be held together really tightly by the two leg pieces. I haven't really been able to do that as well since painting the kit. I probably could tighten it somehow, but I got it standing pretty well now and since I don't see myself moving it around much I'm fine leaving it as is.
Guess I'm gonna bump to share what I've been working on lately:
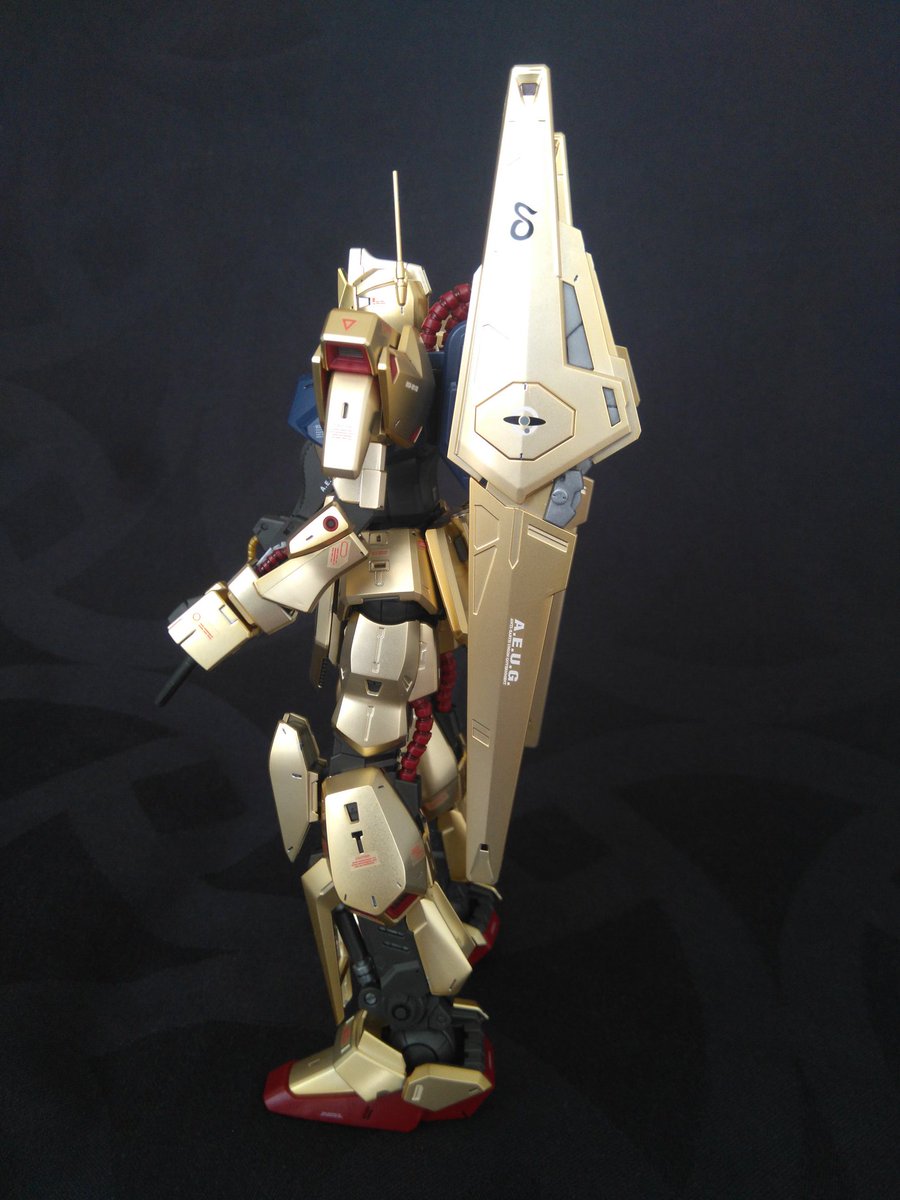
Just need to finish the weapons. Still unsure how much I want to do in terms of panel lining, decals, etc. The kit comes with a set of marking stickers, but I'm especially apprehensive about marring that nice gold finish with stickers.
Just need to finish the weapons. Still unsure how much I want to do in terms of panel lining, decals, etc. The kit comes with a set of marking stickers, but I'm especially apprehensive about marring that nice gold finish with stickers.
It can be divisive whether the stickers are a good decision for the Hyaku Shiki 2.0 but I think the dry transfers look completely fine (specially the black ones).
Posting mine to maybe help you decide. See how the sticker borders are clearly noticeable but the dry transfers blend nicely.
If I'm being honest, everything in a kit like Hyaku Shiki 2.0 should have been dry transfers, no stickers. It would have taken longer to apply everything but it would look better.
Last edited:
Started applying water slides, the decals are pre cut, so that's incredible.


Ran out of top coat, but made some decent progress none the less. Had a couple runs from the panel lining after applying top coat, fixed it a bit, doesn't look too bad. First time I've had this issue, 4th build top coating, using the same gundam marker.
Left top coated, right no top coat.


Ran out of top coat, but made some decent progress none the less. Had a couple runs from the panel lining after applying top coat, fixed it a bit, doesn't look too bad. First time I've had this issue, 4th build top coating, using the same gundam marker.
Left top coated, right no top coat.

these are figures but crossposting in case,
Entertainment Earth opened up, really hard to get, esp. Char, so act now for those looking =)
https://www.entertainmentearth.com/...rx7802-gundam-gffmc-action-figure/blfbas55797
https://www.entertainmentearth.com/...chars-zaku-ii-gffmc-action-figure/blfbas57037
Entertainment Earth opened up, really hard to get, esp. Char, so act now for those looking =)
https://www.entertainmentearth.com/...rx7802-gundam-gffmc-action-figure/blfbas55797
https://www.entertainmentearth.com/...chars-zaku-ii-gffmc-action-figure/blfbas57037
LBX/DANBALL SENKI Plamo look cool !!!
But i can't buy anymore.
Danball Senki are a bit too simple for my taste and I only get them when I find them with an irresistible discount.
That simplicity is the reason I chose to build one after I got slightly burnt out with the MG Hi Nu. Probably taking photos of it this weekend.
Started applying water slides, the decals are pre cut, so that's incredible.
This is looking insane, can't wait to see it finished.

This looks sooooo clean!
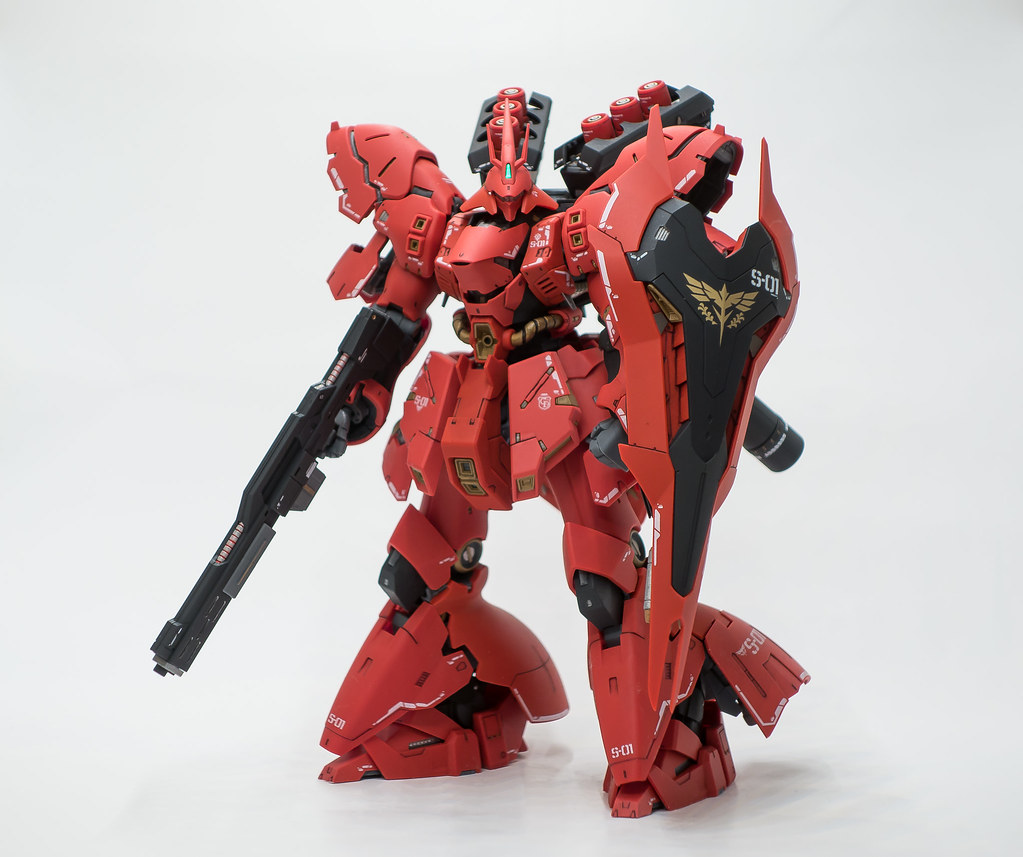
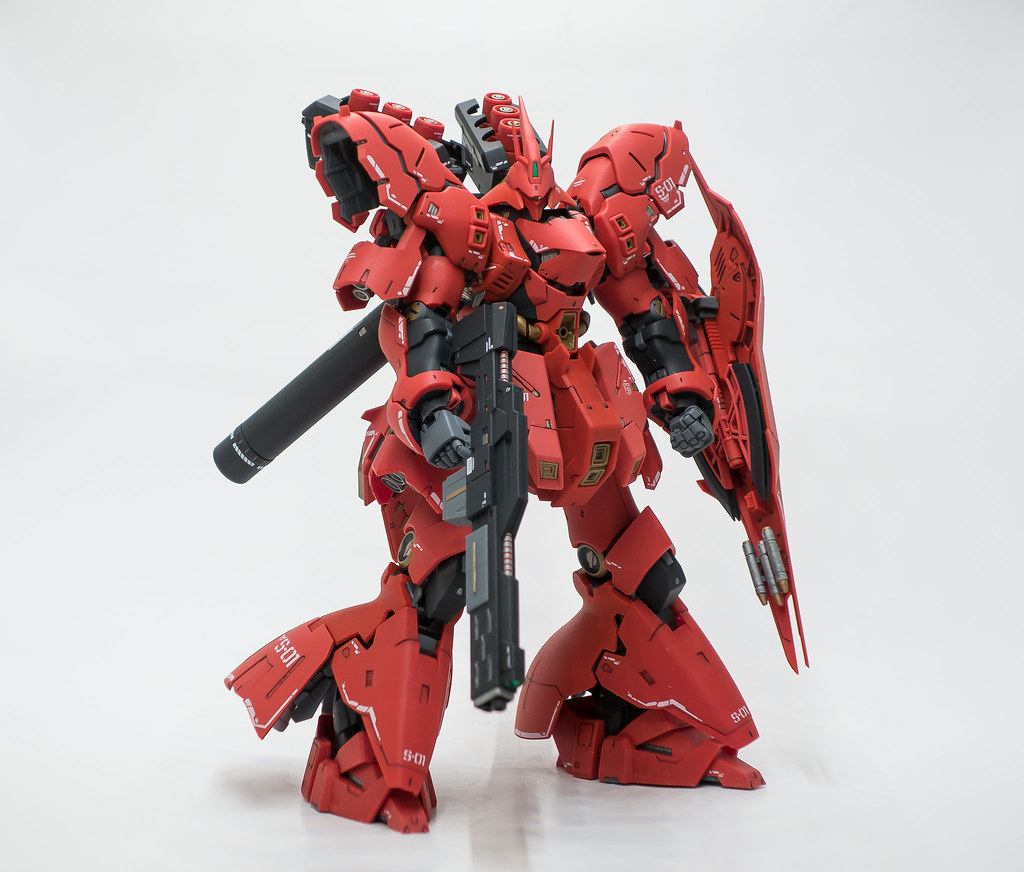
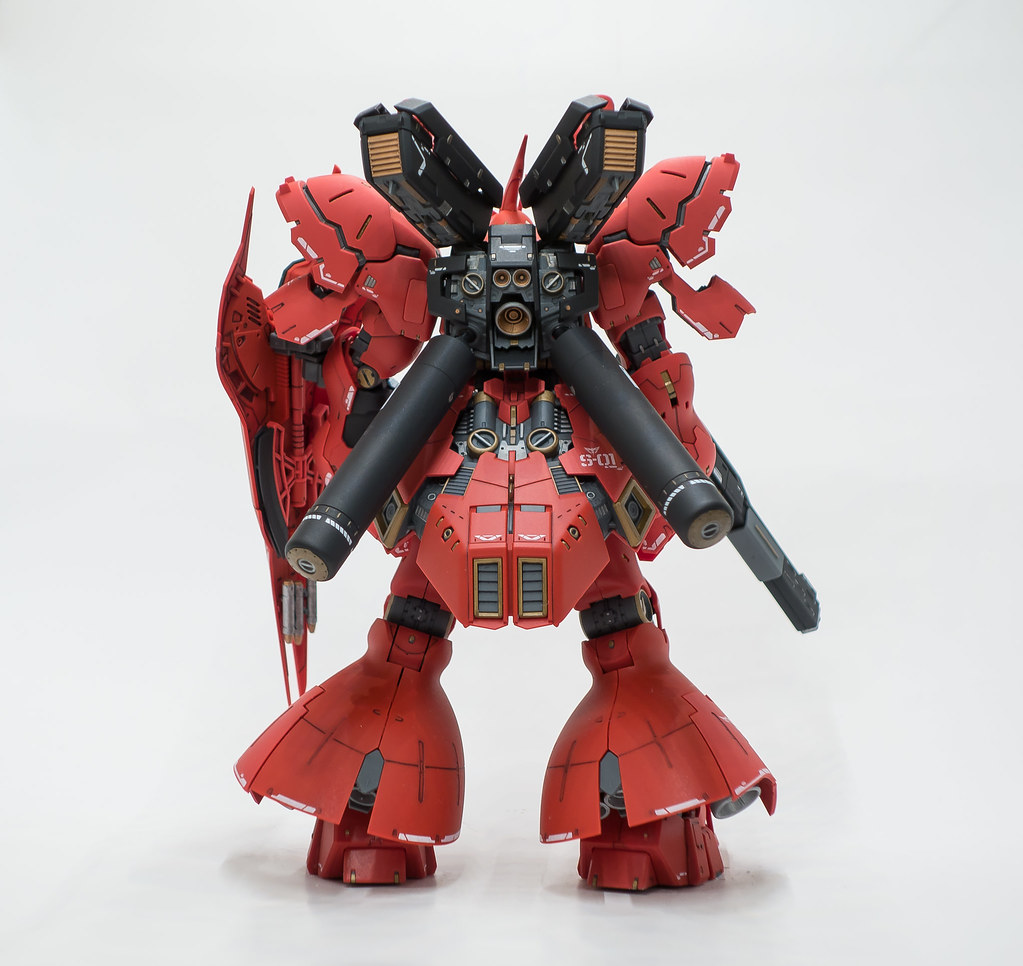
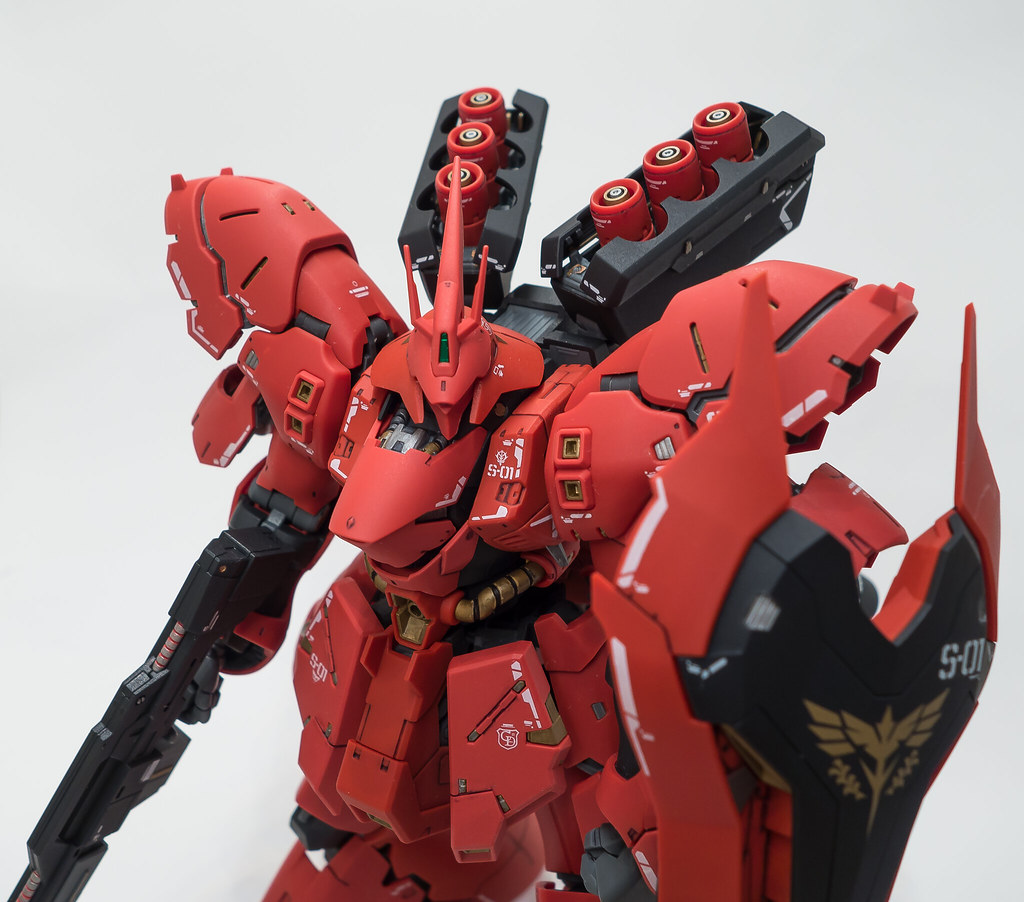
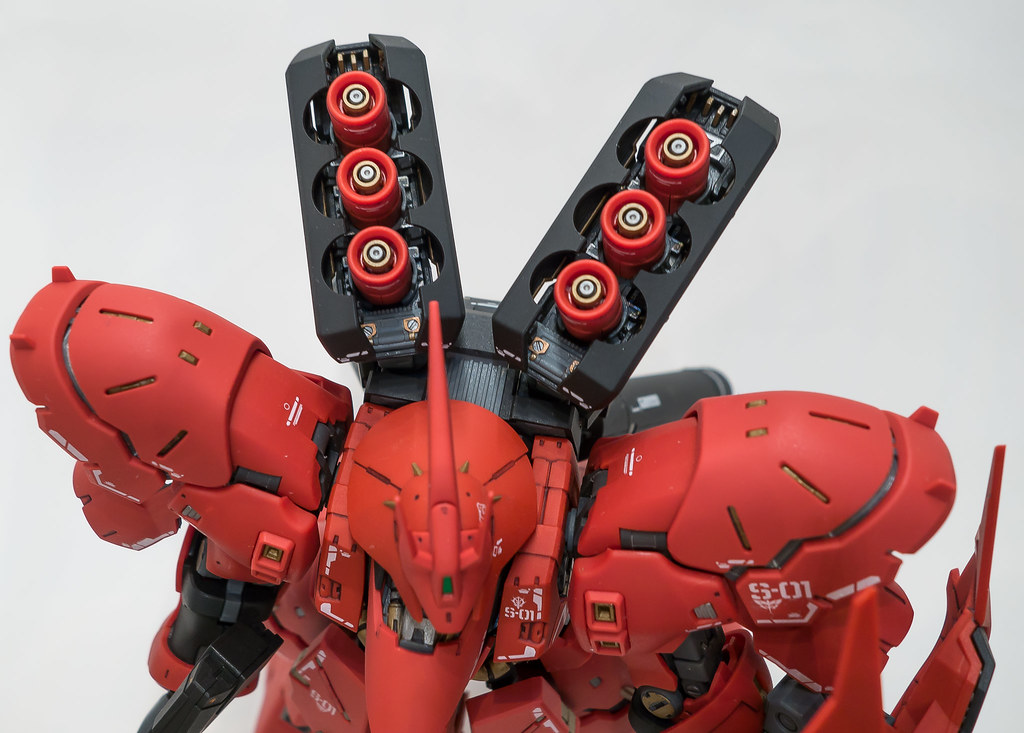
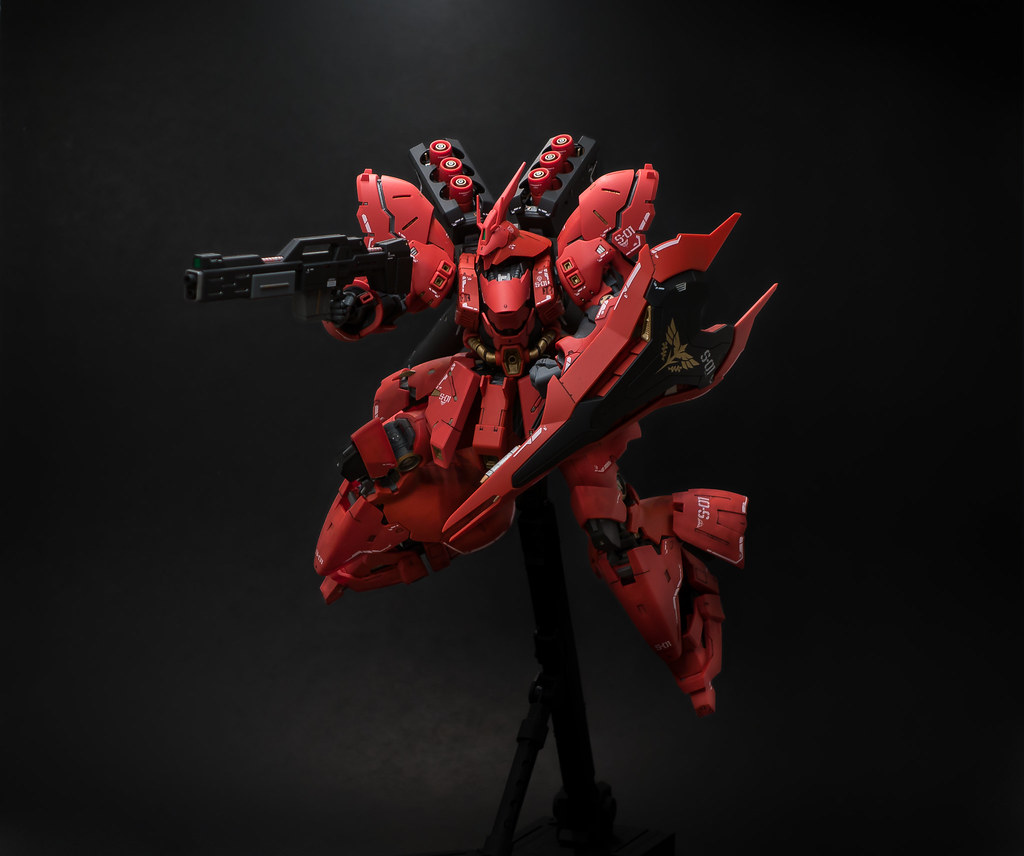
Just finished! Sazabi RG, detail paint, water slide decals, panel lining, and top coat.
Build album - https://imgur.com/a/u6tVwST
Last edited:
Very nice looking.
Kudos on the amount of silver and gold details. That probably took a long time and I always get a bit disheartened if I spend time on things that may not even be visible like, say, the screws on the funnel bays when closed.
Kudos on the amount of silver and gold details. That probably took a long time and I always get a bit disheartened if I spend time on things that may not even be visible like, say, the screws on the funnel bays when closed.
Looks fantastic! I hope my MG Sazabi will look this good when I build it.Just finished! Sazabi RG, detail paint, water slide decals, panel lining, and top coat.
Sooo clean and pretty! Nice!Just finished! Sazabi RG, detail paint, water slide decals, panel lining, and top coat.
Which waterslides did you use? Bandai hasn't released official ones for this one, right?
Very nice looking.
Kudos on the amount of silver and gold details. That probably took a long time and I always get a bit disheartened if I spend time on things that may not even be visible like, say, the screws on the funnel bays when closed.
Sooo clean and pretty! Nice!
Which waterslides did you use? Bandai hasn't released official ones for this one, right?
Thanks, I started the build on January 28th, and just finished last night, March 14th lol.
D.L. model decal, off a seller on ebay.
Last edited:
I've been wanting to try my hand at adding metallic details, just lack the confidence that it would come out looking good. What kind of paint did you use?
I've been wanting to try my hand at adding metallic details, just lack the confidence that it would come out looking good. What kind of paint did you use?
I used metallic sharpie. Very easy and manageable. It was my first time doing the detail work. Just picked up some Gundam markers, silver and gold, and a molotow liquid chrome marker. Will be messing with those on the next build I want to get serious with. Maybe Nu Gundam ver ka
Wow, that looks amazing for sharpie. I have a liquid chrome pen sitting unused in my workspace because I'm a coward.
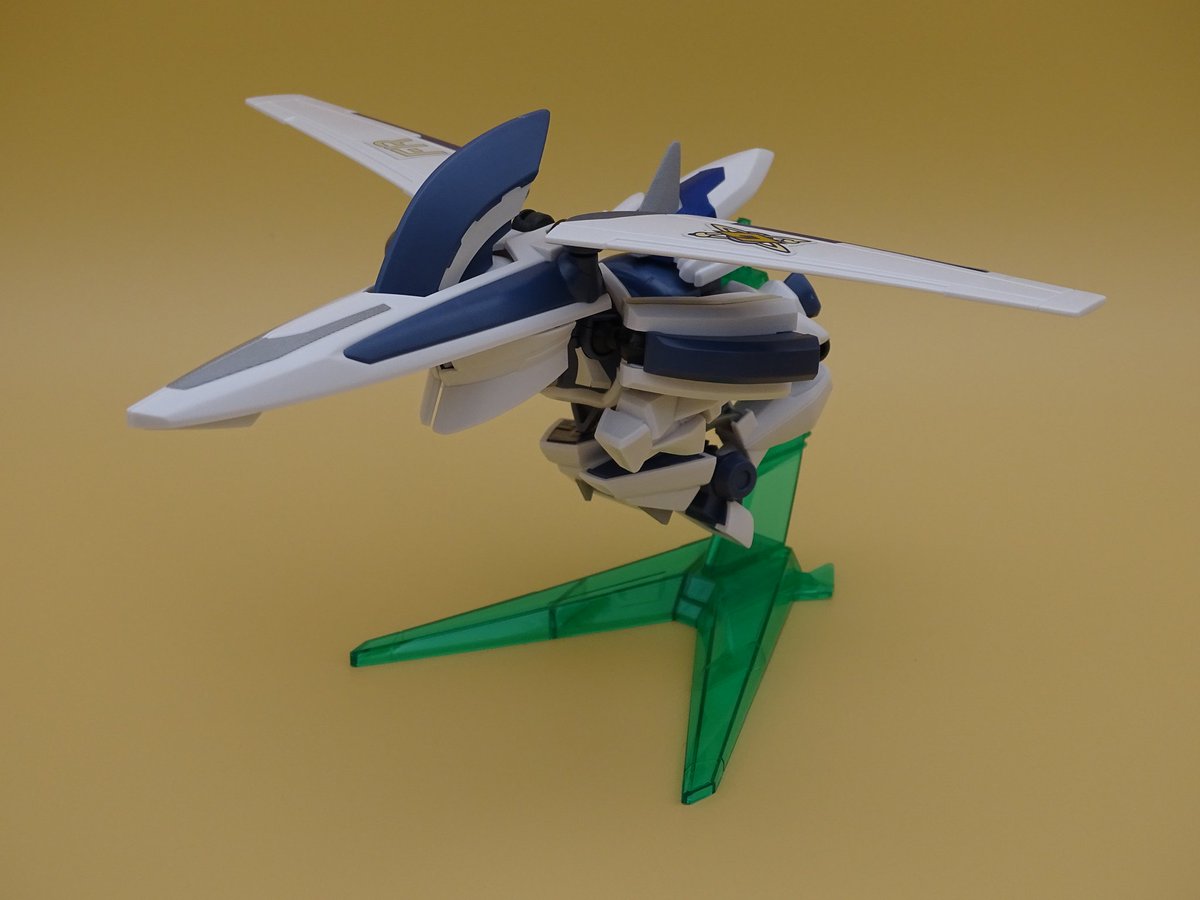
On another topic, is the MG Zeta 2.0 still a decent kit in this day and age? After finishing up the Hyaku-Shiki, I've got a wild hare to combine it with the RE/100 Dijeh and the Zeta so I can recreate this scene:
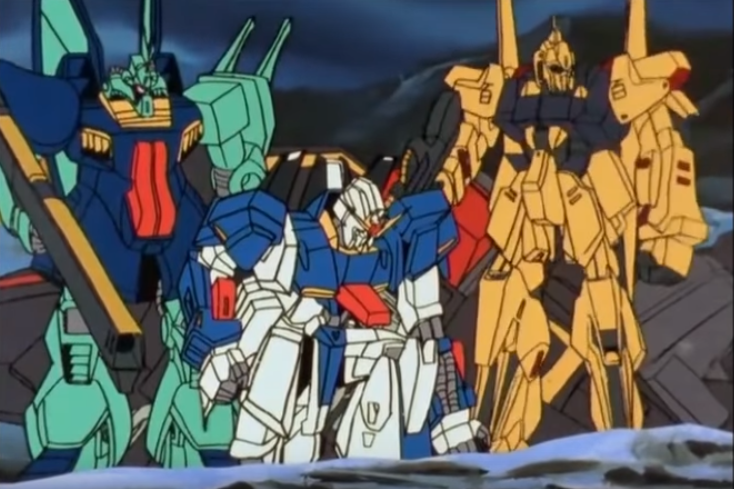
On another topic, is the MG Zeta 2.0 still a decent kit in this day and age? After finishing up the Hyaku-Shiki, I've got a wild hare to combine it with the RE/100 Dijeh and the Zeta so I can recreate this scene:
I think the Zeta 2.0 is fine except for the fact that it is barely stable when standing. The reason being that the legs are difficult to position because of the transformation mechanism and the wings in the backpack are quite heavy.
Unless one puts it in a completely straight pose it is better to have it on a display base.
For the crouching pose, you may be able to pull it off but the ankles have a very limited range of movement.
Regarding the Dijeh it is quite a fun build for a RE/100 as long as you don't expect MG quality. It's like a big HG with a couple of nicer qualities (part separation and certain moving parts) and a decent amount of markings (no dry transfers).
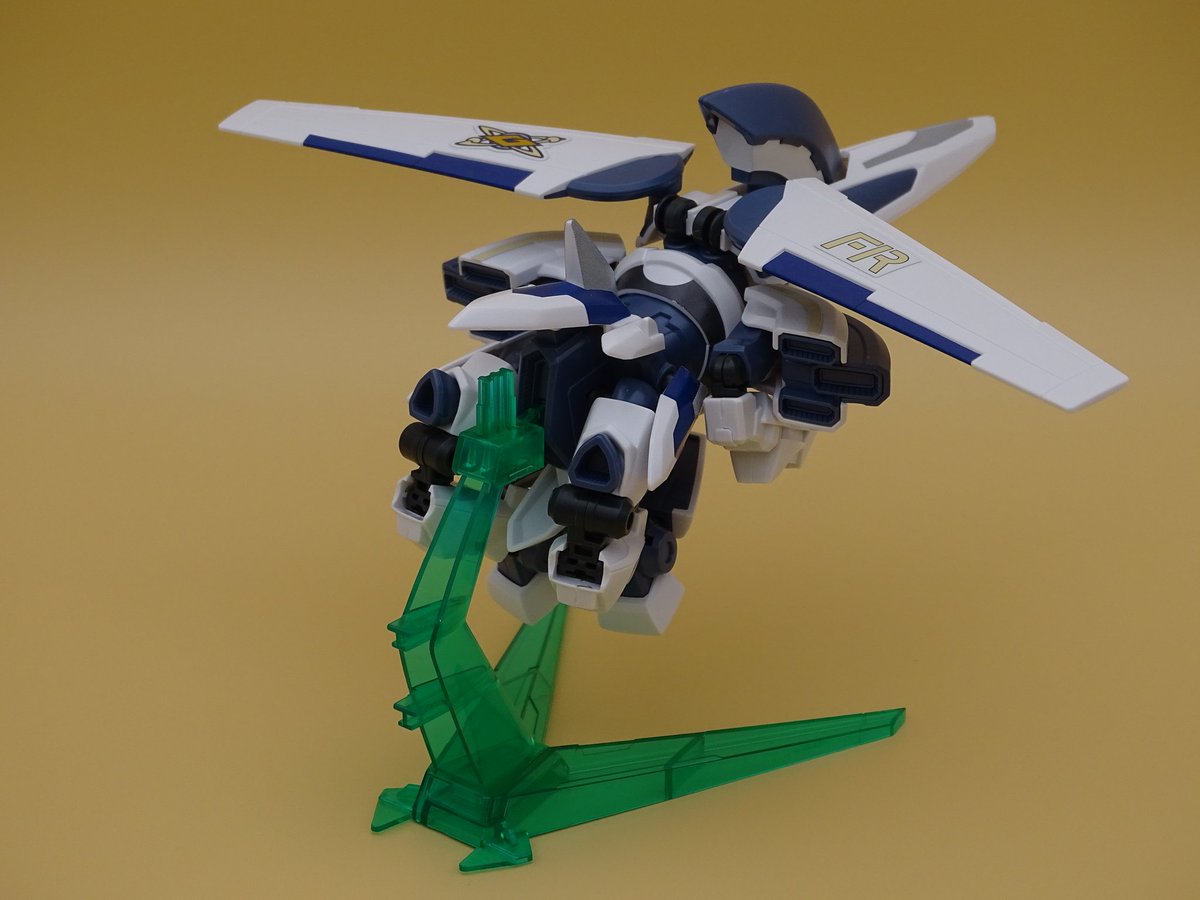
Handy excuse to post my build from a few years ago. My MG Zeta 2.0 is already in the thread. :P


Unless one puts it in a completely straight pose it is better to have it on a display base.
For the crouching pose, you may be able to pull it off but the ankles have a very limited range of movement.
Regarding the Dijeh it is quite a fun build for a RE/100 as long as you don't expect MG quality. It's like a big HG with a couple of nicer qualities (part separation and certain moving parts) and a decent amount of markings (no dry transfers).
Handy excuse to post my build from a few years ago. My MG Zeta 2.0 is already in the thread. :P
Last edited:
Just finished! Sazabi RG, detail paint, water slide decals, panel lining, and top coat.
Build album - https://imgur.com/a/u6tVwST
Wow came out amazing. Also love me some weapon detailing, though I rarely do it myself haha.
God, that looks wonderful. Brilliant work, Superkamikazee!Just finished! Sazabi RG, detail paint, water slide decals, panel lining, and top coat.
Build album - https://imgur.com/a/u6tVwST
Wow came out amazing. Also love me some weapon detailing, though I rarely do it myself haha.
Thank you!
As promised, the latest build is a Danball Senki kit. The classic kits are much simpler than the one in the review that Yukari posted.
This is an absolutely out of the box build with not even panel lining, just the included stickers.
This is for historical reasons since I usually build Danball Senki kits partially with my nephew. The reason being that you don't even need a nipper to get the pieces out of the tree and I avoid panel lining because he just doesn't have the patience for it.
I cannot remember the last time I finished a kit in a single session like I did with this one.
LBX Odin M

It even transforms although it's not specially impressive and the arms are part-formers.
This is an absolutely out of the box build with not even panel lining, just the included stickers.
This is for historical reasons since I usually build Danball Senki kits partially with my nephew. The reason being that you don't even need a nipper to get the pieces out of the tree and I avoid panel lining because he just doesn't have the patience for it.
I cannot remember the last time I finished a kit in a single session like I did with this one.
LBX Odin M
It even transforms although it's not specially impressive and the arms are part-formers.
Last edited:
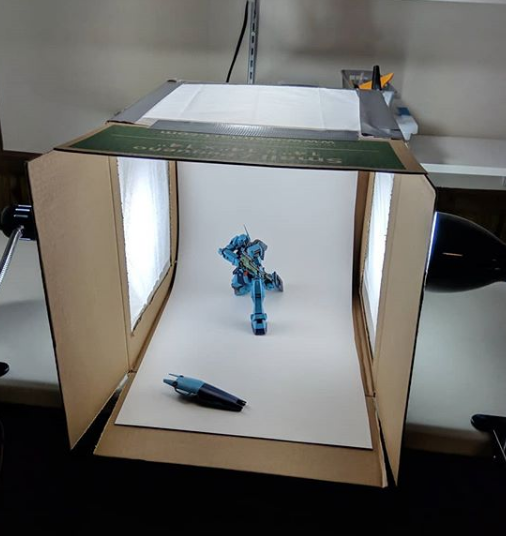
Worked on a new light box today, and put together an Action Base 1 I had laying around.
That's amazing. A good background makes half the picture.
Comparing the two kind of pictures Superkamikazee posted, I'm kind of torn on what I prefer.
Black background is superior from an aesthetic point of view but it loses on clarity compared to white background where you can better appreciate the details.
Black background is superior from an aesthetic point of view but it loses on clarity compared to white background where you can better appreciate the details.
Thanks everyone, appreciate it.
And before anyone thinks it's a fancy setup lol

Used an old box from a pressure washer, and 97 cent black and white poster paper from walmart. The lighting is from my under cabinet lights lol.
And before anyone thinks it's a fancy setup lol
Used an old box from a pressure washer, and 97 cent black and white poster paper from walmart. The lighting is from my under cabinet lights lol.
I recommend getting something to diffuse the light. A mere piece of translucent paper or even some thin fabric helps in making the lighting slightly less directional.Thanks everyone, appreciate it.
And before anyone thinks it's a fancy setup lol
Used an old box from a pressure washer, and 97 cent black and white poster paper from walmart. The lighting is from my under cabinet lights lol.
IMO the harder lighting adds drama to the pose. Not always what you want, but looks great in this case.
I should experiment with my photo setup more. This one shot has me looking into buying a point-and-shoot to replace my phone.
I should experiment with my photo setup more. This one shot has me looking into buying a point-and-shoot to replace my phone.
Last edited:
This one shot has me looking into buying a point-and-shoot to replace my phone.
Same here.
One thing that does wonders to photo quality is getting even the most basic of tripods because too many photos suffer from blurriness caused by accidental moving of a handheld camera when pressing the shutter button (physical or virtual).
Besides, a tripod allows you to play further with exposure time because you don't have to worry about longer exposures being blurry.
Besides, a tripod allows you to play further with exposure time because you don't have to worry about longer exposures being blurry.
Last edited:
IMO the harder lighting adds drama to the pose. Not always what you want, but looks great in this case.
I should experiment with my photo setup more. This one shot has me looking into buying a point-and-shoot to replace my phone.
This is a Sony RX100 mk2, fantastic camera for what it is. I need to get some lights for the sides of the box, was thinking about cutting holes on the sides to better light the model. Usually I have a white back drop, so to top lighting reflects enough to light the whole model. But the black back drop changed that a lot, still learning lol.
This is a Sony RX100 mk2, fantastic camera for what it is. I need to get some lights for the sides of the box, was thinking about cutting holes on the sides to better light the model. Usually I have a white back drop, so to top lighting reflects enough to light the whole model. But the black back drop changed that a lot, still learning lol.
I posted this in the thread a while back, but here's my photo box:
Each side has tissue paper and a lamp. Little bit of a pain to set up, though.
I posted this in the thread a while back, but here's my photo box:
Each side has tissue paper and a lamp. Little bit of a pain to set up, though.
Yup, I need to do that. Will be looking for some cheap LED lights. Maybe some battery powered work lights from a hardware store.
I need to get a lightbox like some posted here. Something bigger than what I'm doing now, anyway. A better and more uniform background too, I'm having to lower the wb and in doing so making my pictures just too dang dark, all in the name of making my black background uniform.
Finally completed Voltrex. As stated in the previous post, only wheels are painted in silver (tires are rubber) by airbrush and red portions are pre-painted out of the box. I have no lightbox so please allow me to show these crappy shots.
Zoatex mode (basically, beast mode). Height is around 19cm.

Vehicle mode (More complex than I expected. Need to remove parts from the main body to complete the build). I do not have a Governor so the seat remains empty.

Went for a "hunting" position for cool shot

One big feature of Hexa Gears line is its hexagonal connections parts, allowing parts from different kits to be interchangeable. The sprues for these hexagonal parts are named ア and イ sprues. I guess these are standardized sprues for all HG kits. This particular kit gives two for each sprue and there are lots of parts left unused. If I get another HG kits down the road (and I totally will), these parts will come in handy for customization.


Overall I am very impressed with the kit. Everything fits right and parts allocations are great. I purposely went for a difficult position to test its balancing and maneuverability and the kit can handle it easily. Being one of the two earliest HG kits produced, this is very impressive. Highly recommend to all.
Zoatex mode (basically, beast mode). Height is around 19cm.
Vehicle mode (More complex than I expected. Need to remove parts from the main body to complete the build). I do not have a Governor so the seat remains empty.
Went for a "hunting" position for cool shot
One big feature of Hexa Gears line is its hexagonal connections parts, allowing parts from different kits to be interchangeable. The sprues for these hexagonal parts are named ア and イ sprues. I guess these are standardized sprues for all HG kits. This particular kit gives two for each sprue and there are lots of parts left unused. If I get another HG kits down the road (and I totally will), these parts will come in handy for customization.
Overall I am very impressed with the kit. Everything fits right and parts allocations are great. I purposely went for a difficult position to test its balancing and maneuverability and the kit can handle it easily. Being one of the two earliest HG kits produced, this is very impressive. Highly recommend to all.
Nice work, Jim_Cacher . Considering how weird it is I'm surprised it hold a pose well.
All of them are kinda expensive so just pick whatever you like.
Hexagear looks pretty cool to me, what's the best one to try for the cost concious that's interested in trying one but doesn't want to spend to much(US based here)
All of them are kinda expensive so just pick whatever you like.
I am surprised, too, especially when I did not have an good experience with one particular frame arm kit as it is easy to fall apart.Nice work, Jim_Cacher . Considering how weird it is I'm surprised it hold a pose well.
I will probably continue working on Command Wolf from ZOIDS next. I have abandoned it for months.
That depends on if you like Governor. They are really small so some people don't think they worth the price. For the beast kits, I would say just pick one you like. I live in Asia so don't know much the prices in the US, but 1999 seems to have the best prices.So just find one and a governor that looks cool and roll with it then Hunh?
Shrug for convience seems most are 60 on amazon, which isn't horrible and most goveners are 20 so if I wind up doing a binge when I clear my backlog a bit it wouldn't be too terribleI am surprised, too, especially when I did not have an good experience with one particular frame arm kit as it is easy to fall apart.
I will probably continue working on Command Wolf from ZOIDS next. I have abandoned it for months.
That depends on if you like Governor. They are really small so some people don't think they worth the price. For the beast kits, I would say just pick one you like. I live in Asia so don't know much the prices in the US, but 1999 seems to have the best prices.
Ooo I've also wanted to try a zoids kit for a while is there an affordable one for giving the line a try?
So I'm working with waterslides for the first time. I was wondering if I should do a protective gloss coat (Pledge finish) before I apply the decals or after? Any tips?
So I'm working with waterslides for the first time. I was wondering if I should do a protective gloss coat (Pledge finish) before I apply the decals or after? Any tips?
I didn't use a top coat before. I put the water slides directly onto the plastic, and used Micro Sol on the water slides once they dried a little bit. Top coated after the micro sol dried.
Gloss when used for waterslides can be applied before to avoid shimmering.
Some people say it may not be needed if applied on unpainted plastic because it's already semi-glossy as opposed to a painted surface that is often slightly rugged and it is what produces the shimmering.
The topcoat after the waterslides (in this case it can be either glossy or matte) would be for protective purposes. There are certain specific products that are used after applying waterslides that help them blend into the surface.
I didn't use a top coat before. I put the water slides directly onto the plastic, and used Micro Sol on the water slides once they dried a little bit. Top coated after the micro sol dried.
Thanks for the tips! I probably should've clarified that I'm airbrushing the kit though.Gloss when used for waterslides can be applied before to avoid shimmering.
Some people say it may not be needed if applied on unpainted plastic because it's already semi-glossy as opposed to a painted surface that is often slightly rugged and it is what produces the shimmering.
The topcoat after the waterslides (in this case it can be either glossy or matte) would be for protective purposes. There are certain specific products that are used after applying waterslides that help them blend into the surface.
There are currently two product lines for Zoids. One is HMM from Kotobukiya, another is Zoids Wild from Takara Tomy. The complexity of HMM series is comparable to MG ~ PG of gundam models while the latter aims at kids. Just done some quick searches on Amazon US and I think the prices of HMM there are too over-priced. If you are able to find another retailer which sell them cheaper, I would recommend picking up a variation of Liger Zero.Shrug for convience seems most are 60 on amazon, which isn't horrible and most goveners are 20 so if I wind up doing a binge when I clear my backlog a bit it wouldn't be too terrible
Ooo I've also wanted to try a zoids kit for a while is there an affordable one for giving the line a try?