A lot of people are confused after they are confronted with Xenoblade's battle system and the OT thread is filled with people who ask questions about it. As the whole system itself is pretty complex and deep, it offers a lot of potential to discuss. And so I decided to follow Kadin's suggestion to open a thread about it.
I have been playing the game for approximately 40 hours, these instructions/descriptions are based on my knowledge and experience that I have collected up to now. If you need something explained in further detail, want to correct something or contribute more to it (I am still trying to solve the the puzzle why the narrator never calls out a blade combo level 2 or level 4!) feel free to!
While the OP is focused on advanced battle mechanics, feel free to ask any combat related questions here even beginner. We will try to help you best we can!

User Interface explained:
1) Auto Attacks
2) Driver Arts
3) Special Attack/Elemental Attack
4) Blade Combo Tree
5) Chain Attack
 by tonyh24613

There is a "tree" to the right which gives you two possible elemental routes. You start from the left to the right.
After you cast the first special attack (A button), a colored gauge appears on the top right of the monster's name. It'll deplete pretty quickly at the beginning (later in the game there will be means to slow the process).
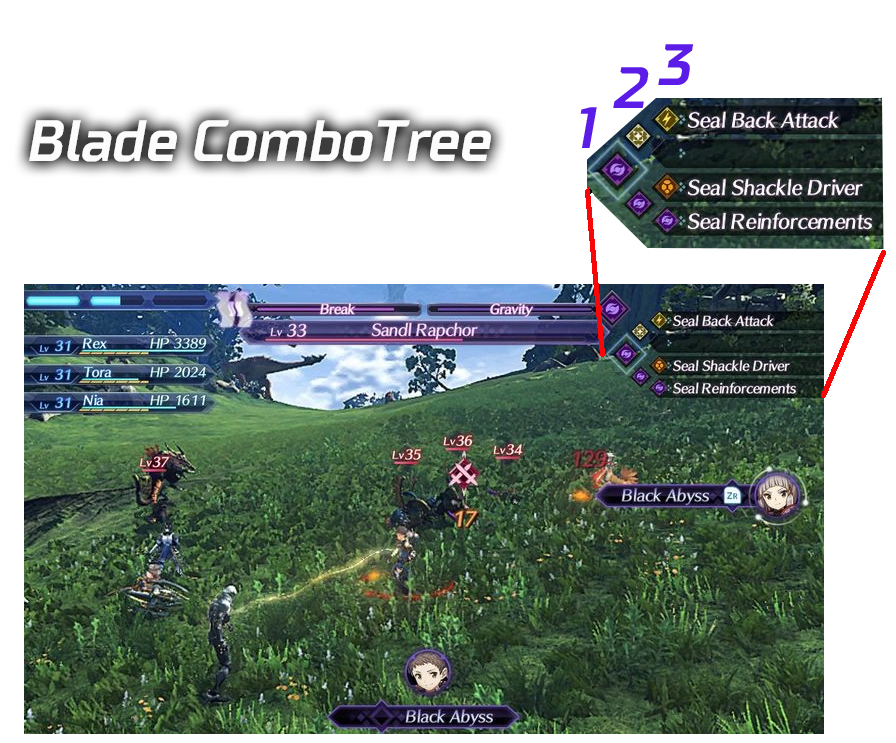
If you cast another special attack before the colored gauge at the top right depletes (be aware that the special attacks must be at least level 2 indicated by the (II) symbol.) you climb up further in the tree.
You can just advance further in the combo if you choose the right element and your special attack provides the minimum level. Second branch minimum level is 2 (II) and in the end you can choose between two options which need to be at least level 3 (III). Higher than branch level always works, lower doesn't. There are many possible combinations: I, II, III is classic; I, IV, III; IV, II, III... you get it I suppose. If you finish off with a level 4 special, you get more hits.

You start off with a tree that has two branches.
Branch one would be special attack 2 light followed by the option of special attack 3 lightning or nothing.
Branch two would be special attack 2 shadow followed by the option of special attack 3 earth or again shadow. After you finished the tree and reached the last branch, you successfully executed a blade combo.
By the way: You should note the 3 orbs around Nia's picture, it means her special attack is level 3. If you want to start a blade combo, you might not want to go for the one with the highest special attack level, since this could be used to advance further in the tree instead. Important is, you can't use your mates special attacks too early, the prompt doesn't pop up unless their elements are compatible with the blade combo tree and the level of it high enough to actually be of use for it.
Your main character, however, can spam special attacks in between that do not fit the tree without disturbing it.
This picture shows an advanced blade combo tree, I already entered the second branch and am left with the wind option (for which neither my mates nor myself carry a blade). Watch out not to go for dead ends.
If you still have difficulties, may want try to take a look at this video. It shows a successful blade combo execution at 1:20.
These are the possible combination of Blade Combo Trees:
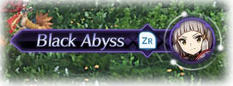
Some monsters gain immunity to elements when hit with a successful blade combo, elemental orbs will float around them. After you succesfully performed blade combo(s) you need to remove the elemental orbs again. We need a chain attack for that.

For the chain attack you need a full party gauge (top left, the white one) and press start. One character after another can choose a special attack now. After a chain attack the party gauge will be empty again, that means you can not do any other action that would normally use up a bar of the party gauge. So use it wisely.
When using a chain attack the goal is to attack a monster that has immunity (elemental orbs) — the more the merrier!! These orbs have each 3 "life-points", that means you have to hit it three times with a special attack. A special attack of the opposite element, however, does 2 damage instead of one. 1 opposite element attack plus any other special attack are at least required to burst an orb.
For each orb you burst the burst gauge that replaces the party gauge in the top left is filled up a bit, it refills more effectively when you burst more than one orb in one turn. That means basically you aim for destroying as many orbs in a turn as possible because you want to fill up that burst gauge. When you burst at least one orb in a turn, you will be rewarded with a QTE, if successful you will receive a bonus turn for the whole party. This way you are able to keep spamming one turn after another.
You are able to "overkill" a monster with a chain attack (a pop up appears), and this is good. You will receive a boost in experience and loot whenever this happens. Don't worry, just because you overkilled it doesn't mean you can't keep hitting on the poor thing. The "dead monster" remains your target till your chain attack ends due to the fact that you are out of orb bursts or the burst gauge has completely filled up, that means you can continue and gain "extra turns" despite hitting on a dead body.
When you managed to fill up your entire burst gauge, you will perform a super powerful level 4 special attack and the chain attack is over.

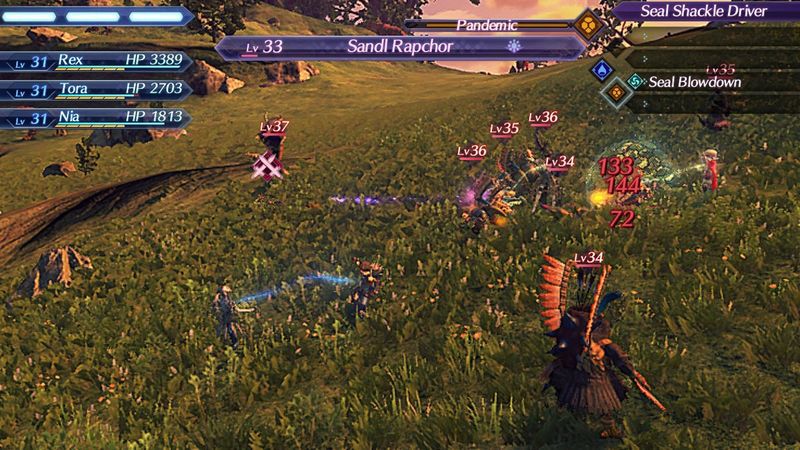
The driver combo basically sits between the white party gauge and the blade combo gauge. It can only be triggered by driver arts. In combination with Blade Combo it turns into Fusion Combo. Later more about that.
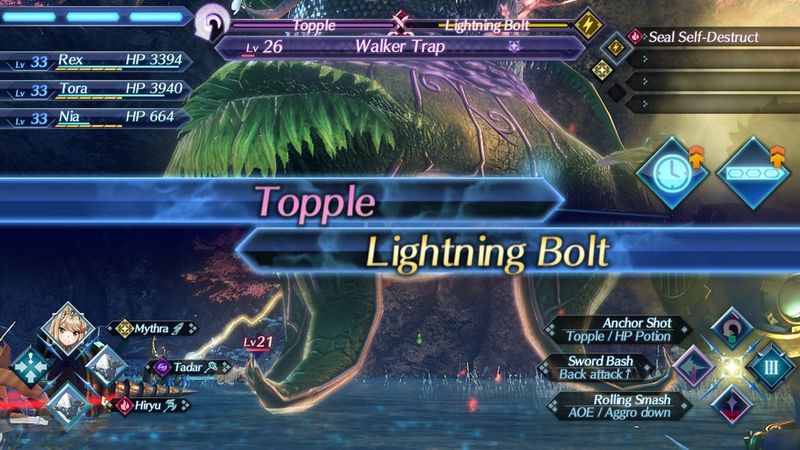
Above the monster name, on the right side, we can see (here yellow) gauge for the blade combo that we have read about before, next to it appears another one. In this example it's purple and states Break. This gauge is for driver combos. (It's very fast so quick acting is recommended.)
Driver combos can be solely caused by driver arts, hence the name. This also means they could take place without the blade combo gauge being active. Not necessarily exclusively. They go in a chain, if you link them up quickly enough: Break (we have seen that here), topple, launch sends the enemy off their feet flying through the air and smash crushes them.
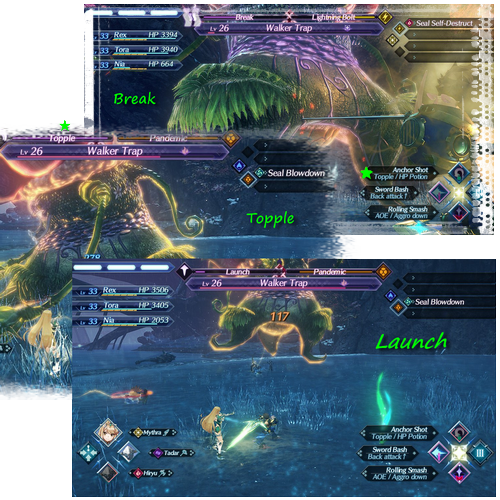
Whether your driver's arts are capable of causing a driver combo effect you can tell by the symbols. It is, however, also stated next to the art.

Now, as you can see in that picture above, it will happen that driver and blade art are used simultaneously. That just happens in battle flow, and that's good. That's what is called "fusion combo", as you fuse the driver and the blades combos. As simple as that.
This is how a fusion combo looks like.
 by tonyh24613
Canceling is a system to charge your special gauge faster by input battle actions at the right timing. The timing is right after the attack hit the enemy(last hit if the attack has multiple hits).

Normally every art add +2 to special gauge, but with canceling you can add much more. In demo Nintendo said multiple times you can use arts after canceling auto attacks, and there's much more they haven't told us:
(auto attacks, arts, blade switching) -> (canceling) -> (arts, blade switching, special)
Some canceling may require driver affinity skills:
Based on the wording I suppose the bonus gauge you get is based on the prior action you canceled, not the action after.
Normally:
Use driver arts: +2
Topple enemy: +1
Launch enemy: +2
Smash enemy: +3
Special QTE good: +1
Special QTE cool: +2
Special QTE excellent: +4
The bonus you'll get by canceling
Canceling 1st hit of auto attack: +1
Canceling 2nd hit of auto attack: +2
Canceling 3rd hit of auto attack: +3
Canceling driver arts:+2
Canceling blade switch: +2
So, theoretically, if all your blades are done cooldown and party members break the enemy for you.
3rd hit of auto attack, cancel, topple art (2+3+1), cancel, switch blade (+2), cancel, launch art (2+2+2), cancel, switch blade (+2), cancel, smash art (2+2+3) = +23
That's only 3 arts, you can even activate fusion combos by other members during this process. Without canceling the process only gives +12.
If you are still struggelling with the cancel mechanics, please take a look at the following videos:
 by Jiraiza
This is not exactly part of the game mechanics, but I will put it in here as it might help to charge weapons with lower attack speed and help especially at the beginning of the game. This trick allows you to skip the rather slow attack animation of the slower weapons and build up your Driver Arts initially.
Please remember that, for building up Blade Arts quickly, you should use the cancel technique. I also think that the usage of this technique in the higher levels of the game is not to be adviced.
I have been playing the game for approximately 40 hours, these instructions/descriptions are based on my knowledge and experience that I have collected up to now. If you need something explained in further detail, want to correct something or contribute more to it (I am still trying to solve the the puzzle why the narrator never calls out a blade combo level 2 or level 4!) feel free to!
While the OP is focused on advanced battle mechanics, feel free to ask any combat related questions here even beginner. We will try to help you best we can!
User Interface explained:
1) Auto Attacks
2) Driver Arts
3) Special Attack/Elemental Attack
4) Blade Combo Tree
5) Chain Attack
Special attacks (element attack) have 4 levels, for the first 3 levels the gauge are eight-fold, you can build them up by using driver arts or pouch items. After level 3, special gauge will auto charge to level 4 when the link between driver and blade are glowing and drivers stand close enough to the blade. Will drop back to level 3 if the link break or the blade is switched.
There is a "tree" to the right which gives you two possible elemental routes. You start from the left to the right.
After you cast the first special attack (A button), a colored gauge appears on the top right of the monster's name. It'll deplete pretty quickly at the beginning (later in the game there will be means to slow the process).
If you cast another special attack before the colored gauge at the top right depletes (be aware that the special attacks must be at least level 2 indicated by the (II) symbol.) you climb up further in the tree.
You can just advance further in the combo if you choose the right element and your special attack provides the minimum level. Second branch minimum level is 2 (II) and in the end you can choose between two options which need to be at least level 3 (III). Higher than branch level always works, lower doesn't. There are many possible combinations: I, II, III is classic; I, IV, III; IV, II, III... you get it I suppose. If you finish off with a level 4 special, you get more hits.
You start off with a tree that has two branches.
Branch one would be special attack 2 light followed by the option of special attack 3 lightning or nothing.
Branch two would be special attack 2 shadow followed by the option of special attack 3 earth or again shadow. After you finished the tree and reached the last branch, you successfully executed a blade combo.
By the way: You should note the 3 orbs around Nia's picture, it means her special attack is level 3. If you want to start a blade combo, you might not want to go for the one with the highest special attack level, since this could be used to advance further in the tree instead. Important is, you can't use your mates special attacks too early, the prompt doesn't pop up unless their elements are compatible with the blade combo tree and the level of it high enough to actually be of use for it.
Your main character, however, can spam special attacks in between that do not fit the tree without disturbing it.
This picture shows an advanced blade combo tree, I already entered the second branch and am left with the wind option (for which neither my mates nor myself carry a blade). Watch out not to go for dead ends.
If you still have difficulties, may want try to take a look at this video. It shows a successful blade combo execution at 1:20.
Start of wind combo at 0:35 and ends at ~1:30
These are the possible combination of Blade Combo Trees:
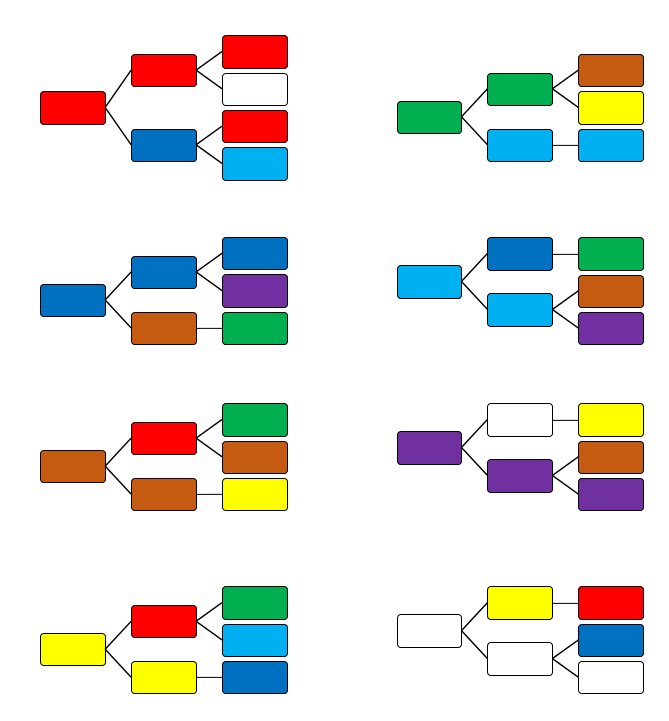
Red = fire
Ice = lightblue
Water = blue
White = light
Brown = earth
Green = wind
Yellow = lightning
Purple = darkness
Some monsters gain immunity to elements when hit with a successful blade combo, elemental orbs will float around them. After you succesfully performed blade combo(s) you need to remove the elemental orbs again. We need a chain attack for that.
For the chain attack you need a full party gauge (top left, the white one) and press start. One character after another can choose a special attack now. After a chain attack the party gauge will be empty again, that means you can not do any other action that would normally use up a bar of the party gauge. So use it wisely.
When using a chain attack the goal is to attack a monster that has immunity (elemental orbs) — the more the merrier!! These orbs have each 3 "life-points", that means you have to hit it three times with a special attack. A special attack of the opposite element, however, does 2 damage instead of one. 1 opposite element attack plus any other special attack are at least required to burst an orb.
For each orb you burst the burst gauge that replaces the party gauge in the top left is filled up a bit, it refills more effectively when you burst more than one orb in one turn. That means basically you aim for destroying as many orbs in a turn as possible because you want to fill up that burst gauge. When you burst at least one orb in a turn, you will be rewarded with a QTE, if successful you will receive a bonus turn for the whole party. This way you are able to keep spamming one turn after another.
You are able to "overkill" a monster with a chain attack (a pop up appears), and this is good. You will receive a boost in experience and loot whenever this happens. Don't worry, just because you overkilled it doesn't mean you can't keep hitting on the poor thing. The "dead monster" remains your target till your chain attack ends due to the fact that you are out of orb bursts or the burst gauge has completely filled up, that means you can continue and gain "extra turns" despite hitting on a dead body.
When you managed to fill up your entire burst gauge, you will perform a super powerful level 4 special attack and the chain attack is over.
The driver combo basically sits between the white party gauge and the blade combo gauge. It can only be triggered by driver arts. In combination with Blade Combo it turns into Fusion Combo. Later more about that.
Above the monster name, on the right side, we can see (here yellow) gauge for the blade combo that we have read about before, next to it appears another one. In this example it's purple and states Break. This gauge is for driver combos. (It's very fast so quick acting is recommended.)
Driver combos can be solely caused by driver arts, hence the name. This also means they could take place without the blade combo gauge being active. Not necessarily exclusively. They go in a chain, if you link them up quickly enough: Break (we have seen that here), topple, launch sends the enemy off their feet flying through the air and smash crushes them.
Whether your driver's arts are capable of causing a driver combo effect you can tell by the symbols. It is, however, also stated next to the art.
Now, as you can see in that picture above, it will happen that driver and blade art are used simultaneously. That just happens in battle flow, and that's good. That's what is called "fusion combo", as you fuse the driver and the blades combos. As simple as that.
This is how a fusion combo looks like.
Canceling is a system to charge your special gauge faster by input battle actions at the right timing. The timing is right after the attack hit the enemy(last hit if the attack has multiple hits).
Normally every art add +2 to special gauge, but with canceling you can add much more. In demo Nintendo said multiple times you can use arts after canceling auto attacks, and there's much more they haven't told us:
(auto attacks, arts, blade switching) -> (canceling) -> (arts, blade switching, special)
Some canceling may require driver affinity skills:
Based on the wording I suppose the bonus gauge you get is based on the prior action you canceled, not the action after.
Normally:
Use driver arts: +2
Topple enemy: +1
Launch enemy: +2
Smash enemy: +3
Special QTE good: +1
Special QTE cool: +2
Special QTE excellent: +4
The bonus you'll get by canceling
Canceling 1st hit of auto attack: +1
Canceling 2nd hit of auto attack: +2
Canceling 3rd hit of auto attack: +3
Canceling driver arts:+2
Canceling blade switch: +2
So, theoretically, if all your blades are done cooldown and party members break the enemy for you.
3rd hit of auto attack, cancel, topple art (2+3+1), cancel, switch blade (+2), cancel, launch art (2+2+2), cancel, switch blade (+2), cancel, smash art (2+2+3) = +23
That's only 3 arts, you can even activate fusion combos by other members during this process. Without canceling the process only gives +12.
If you are still struggelling with the cancel mechanics, please take a look at the following videos:
Rex switch into Hiden, cancel, and use uppercut.
Here is another video example:
Rex doing two cancels in a row, first he cancels his art and then cancels his blade switch.
Here is another video example:
Rex doing two cancels in a row, first he cancels his art and then cancels his blade switch.
This is not exactly part of the game mechanics, but I will put it in here as it might help to charge weapons with lower attack speed and help especially at the beginning of the game. This trick allows you to skip the rather slow attack animation of the slower weapons and build up your Driver Arts initially.
Please remember that, for building up Blade Arts quickly, you should use the cancel technique. I also think that the usage of this technique in the higher levels of the game is not to be adviced.
Last edited: