-
Ever wanted an RSS feed of all your favorite gaming news sites? Go check out our new Gaming Headlines feed! Read more about it here.
-
We have made minor adjustments to how the search bar works on ResetEra. You can read about the changes here.
DIY & Workshop |OT| Can we fix it again?
- Thread starter DBT85
- Start date
You are using an out of date browser. It may not display this or other websites correctly.
You should upgrade or use an alternative browser.
You should upgrade or use an alternative browser.
Love the old school Record router DBT85.
About 2 years ago I inheritated my old man's vintage tool collection. Must have been 100+ planes, old American Stanley's pre-1900, Records, Australian made one's, heaps of wooden ones, Mathieson and mainland Euro one's etc... Even some new American ones, Veritas and Lie-Nielsen. I've sold a heap as I have no room for 100 planes but I've kept a nice handful for myself.
He also collected saws so now I have 50+ Disston's, Spear and Jackson and some other wild stuff. And Braces. And Chisels!
OP
OP
Alas you should have held on, some of them sell for crazy money at the moment lol.Love the old school Record router DBT85.
About 2 years ago I inheritated my old man's vintage tool collection. Must have been 100+ planes, old American Stanley's pre-1900, Records, Australian made one's, heaps of wooden ones, Mathieson and mainland Euro one's etc... Even some new American ones, Veritas and Lie-Nielsen. I've sold a heap as I have no room for 100 planes but I've kept a nice handful for myself.
He also collected saws so now I have 50+ Disston's, Spear and Jackson and some other wild stuff. And Braces. And Chisels!
It's part of my attempt to learn some new hand tool skills. I've powertools for basically everything but noise/dust are a pain and I like the idea of trying to work by hand a bit. Even bought an old brace and bit and hand drill so that when complete I can say that my workbench will be 100% hand made (once the timber had been chopped down, sawn, planed by machine before I bought it :P)
Alas you should have held on, some of them sell for crazy money at the moment lol.
It's part of my attempt to learn some new hand tool skills. I've powertools for basically everything but noise/dust are a pain and I like the idea of trying to work by hand a bit. Even bought an old brace and bit and hand drill so that when complete I can say that my workbench will be 100% hand made (once the timber had been chopped down, sawn, planed by machine before I bought it :P)
I kept a full set of Turners, really nice Australia made planes from the 1950-1960s. Beautiful things with red acetate handles and berg blades. (Not mine below)

I've been slowly selling on eBay, the thirst is surprisingly real. Plenty have sold for AUD$300+ or £200+. It's a bit sad to see them go but it's good to see them go to serious collectors.
I've always been more into function over form so if I can do it quickly with a power tool I will but getting to understand proper hand technique and sharpening has been a joy. There is something very satisfying about using a massive 90+ year old 3.5/inch thumbhole Disston rip saw when it's properly sharpened!
Workbench game looking strong DBT85.
Pic dump of the last week on the table project incoming.

Went with Domino tenons instead of traditional to get this thing moving.

The importance of test pieces.

Trying the tape trick for removing the glue.

The goal was to use zero plywood on this project, but I needed a panel to hide the surprise and I didn't want to have to deal with expansion and contraction issues.

Not bad, stain will help out.

The surprise arrives. Drawer sides cut and dadoed, the slide spacers glued and tacked in place.

Through tenons on the drawer construction. Push to open slides, so no visible clue of what hides inside.

Drawer? What drawer? Final look mocked up.
Pic dump of the last week on the table project incoming.
Went with Domino tenons instead of traditional to get this thing moving.
The importance of test pieces.
Trying the tape trick for removing the glue.
The goal was to use zero plywood on this project, but I needed a panel to hide the surprise and I didn't want to have to deal with expansion and contraction issues.
Not bad, stain will help out.
The surprise arrives. Drawer sides cut and dadoed, the slide spacers glued and tacked in place.
Through tenons on the drawer construction. Push to open slides, so no visible clue of what hides inside.
Drawer? What drawer? Final look mocked up.
Can I get your opinion on this. So I have an outdoor turkey fryer burner that I use to cook tacos on a wok. So the regulator shit the bed last year and no gas was coming out. So now that the weather is good, I bought a new regulator and hose, but the valve for the burner isn't threaded. It's safe enough to cut the fitting and throw the hose on there with a clamp, right?
here's the hose and regulator i bought
https://www.amazon.com/gp/product/B078K8DSXC/ref=oh_aui_detailpage_o00_s00?ie=UTF8&psc=1

here's the hose and regulator i bought
https://www.amazon.com/gp/product/B078K8DSXC/ref=oh_aui_detailpage_o00_s00?ie=UTF8&psc=1
it's not threaded on the inside. How would I go about it?If it were me, personally, no. I'd at the minimum flare the end so that I'd get a better seal on the hose.
Cool deal. Thank you very much!
Here's also an article on it to where you can put the fitting you need on, then flare so that everything is perfect.
http://www.finehomebuilding.com/2016/09/26/make-flare-connection
http://www.finehomebuilding.com/2016/09/26/make-flare-connection
Everything but the top and the drawer front has been stained, but I am extremely unhappy with how the legs came out. Going to take the stain down to bare, plane and scrape, and do it again.

Finally made a rolling cart for my Festool MFT, gives me a bunch more storage and the ability to easily move it out of the way so I can drop the attic ladder.

Finally made a rolling cart for my Festool MFT, gives me a bunch more storage and the ability to easily move it out of the way so I can drop the attic ladder.
Close up of the leg, after I took it back down, and final result.


Son helping put together the top with 6x40mm Dominos.

I had to do a little bit of light planing at the panel edges, not for unevenness, but because there was a little bit of a bow. Unfortunately the final sanding and my eyes didn't pick up that there were residual edges. I really need to radius my plane blades.

So, that had to be taken back down to bare and done again. Went to 80 grit on this and the legs, and there were even more spots that I eventually had to do this on because I wasn't quite happy with the finish. Unfortunately, on the bottom, there is a place where I'm going to have to take the whole bottom back down to bare and refinish, but that will come at some other time.
Drilled holes for the figure eight top fasteners. A little loose for top movement.

Top re-stained.

Final results.


Son helping put together the top with 6x40mm Dominos.
I had to do a little bit of light planing at the panel edges, not for unevenness, but because there was a little bit of a bow. Unfortunately the final sanding and my eyes didn't pick up that there were residual edges. I really need to radius my plane blades.
So, that had to be taken back down to bare and done again. Went to 80 grit on this and the legs, and there were even more spots that I eventually had to do this on because I wasn't quite happy with the finish. Unfortunately, on the bottom, there is a place where I'm going to have to take the whole bottom back down to bare and refinish, but that will come at some other time.
Drilled holes for the figure eight top fasteners. A little loose for top movement.
Top re-stained.
Final results.
I still haven't gotten around to getting FIOS yet, but I decided to alter the route of the Ethernet cable I wanted to lay down. I had originally planned to go through the basement, but decided instead to go through the garage as that seems to be more common. The family room shares a common wall with the garage, with one standard phone plug on the family room side. I have yet to remove it and take a look behind the wall, but I'm hoping it would be a simple matter of just poking a hole through the garage wall to run the Ethernet cable through. I'd be using the phone/Ethernet wall plate I originally bought when I was going to go through the basement. Now the problem is that the garage is obviously not climate controlled and gets pretty hot in the summer and cold in the winter. I'd need the hole on the garage side to be big enough to feed the Ethernet connector through, which leaves a pretty large gap once its just flat cable hanging in there. Can one spray insulation foam around the hole once the cable is in place to try to mitigate any drafts, or will that damage the cable?
OP
OP
Really liking that final output Cochese. Great job!
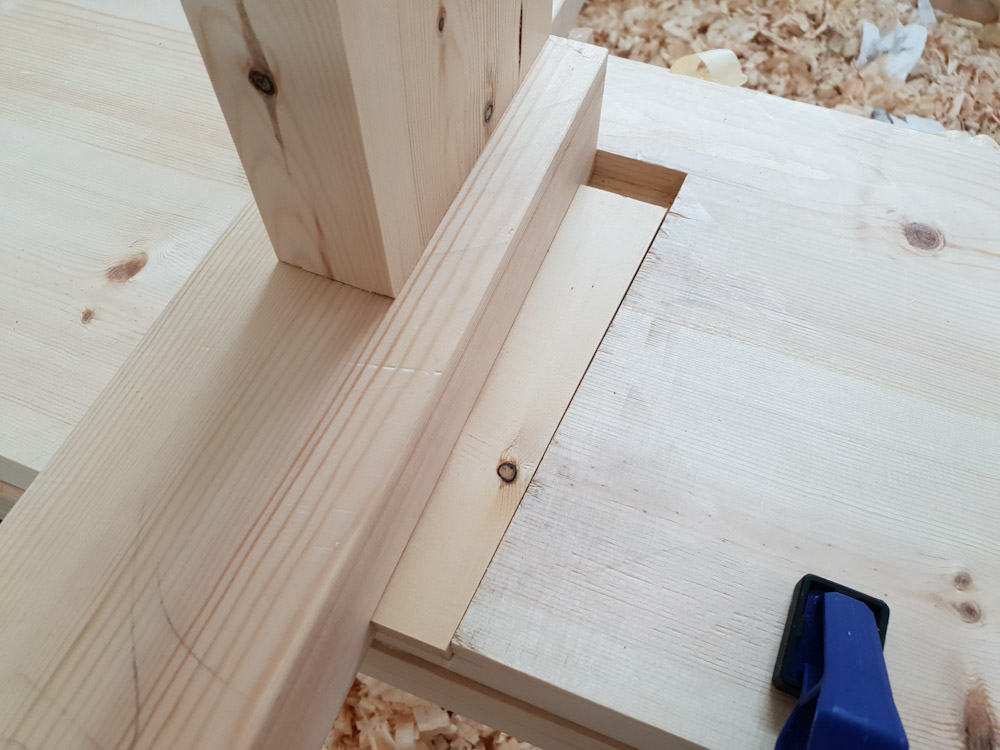
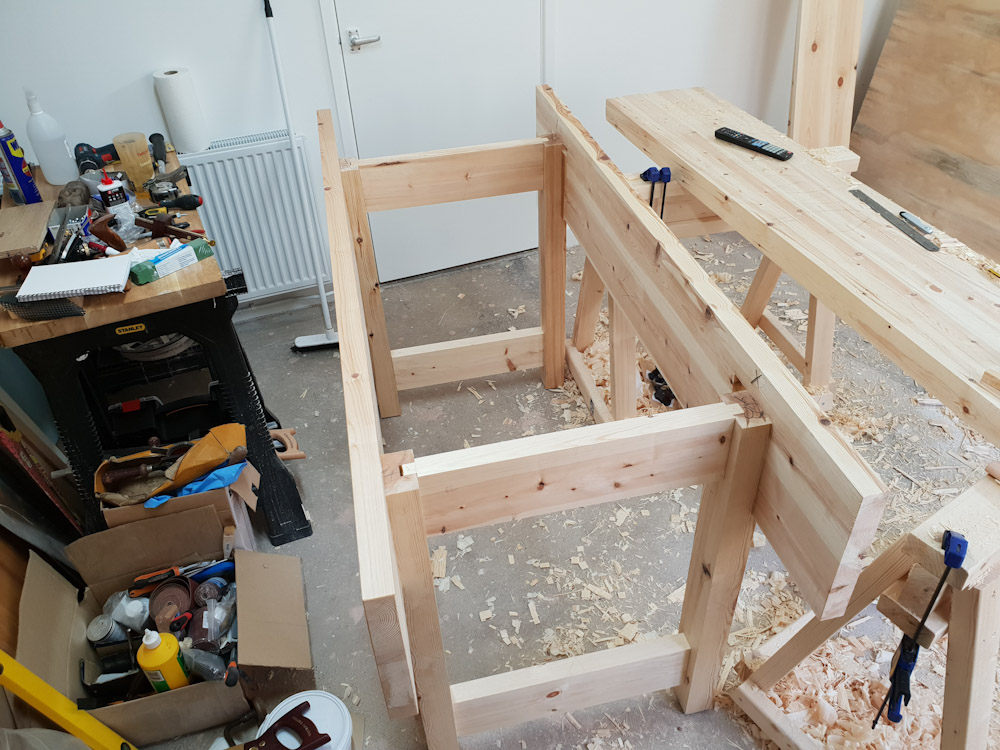
My workbench is getting there. Aprons all recessed and taking the legs. Absolutely no movement once the wedges are put in and I've still not put any glue on anything yet.
Still work to do obviously, but the major work is complete.

That would be fine.
I would just run the cable and put the connectors on afterwards. RJ45s get caught on bloody everything and they are easy to fit.
My workbench is getting there. Aprons all recessed and taking the legs. Absolutely no movement once the wedges are put in and I've still not put any glue on anything yet.
Still work to do obviously, but the major work is complete.
I'd need the hole on the garage side to be big enough to feed the Ethernet connector through, which leaves a pretty large gap once its just flat cable hanging in there. Can one spray insulation foam around the hole once the cable is in place to try to mitigate any drafts, or will that damage the cable?
That would be fine.
I would just run the cable and put the connectors on afterwards. RJ45s get caught on bloody everything and they are easy to fit.
OP
OP
You can cut it off and put a new one on. It's really easy. Honest.I had already bought a cable with connectors attached, so I'll still have to get the cable through connector and all.
Is there anywhere brick and mortar to buy some RJ45 connectors cheap? I had already bought a bag of RJ11s for the other part of the project as part of a large Amazon order, and I don't have Prime so I don't want to order online if I don't have to.You can cut it off and put a new one on. It's really easy. Honest.
OP
OP
In th eUS, no idea. Ebay is usually good for that sort of thing.Is there anywhere brick and mortar to buy some RJ45 connectors cheap? I had already bought a bag of RJ11s for the other part of the project as part of a large Amazon order, and I don't have Prime so I don't want to order online if I don't have to.
If its only got to go through the 1 wall then maybe it's not worth it. You need a crimp tool which you may or may not have.
I actually do have a 2-in-1 crimping tool that I had originally just gotten to deal with the phone cable. Since I'm running a significantly shorter length from the family room to the garage than it would have been from the kitchen into the basement, I may just chop up the cable (50') into smaller pieces since I'd need one for the ONT to the wall plug, then one from the wall plug to the router. I had checked eBay, but it seems Walmart actually sells them cheaper, though still have to buy a 50pc. bag and wait a few days for it to get to the store for pickup.
OP
OP
Do you happen to work anywhere where you might lift some from the IT dept?I actually do have a 2-in-1 crimping tool that I had originally just gotten to deal with the phone cable. Since I'm running a significantly shorter length from the family room to the garage than it would have been from the kitchen into the basement, I may just chop up the cable (50') into smaller pieces since I'd need one for the ONT to the wall plug, then one from the wall plug to the router. I had checked eBay, but it seems Walmart actually sells them cheaper, though still have to buy a 50pc. bag and wait a few days for it to get to the store for pickup.
OP
OP
Cheers dude. Should hope so it's taken me ages.Thanks for the kind words. My son loves it.
That bench looking good.
Doing anything when you have just 1 kids takes so much longer lol
I realized I hadn't posted progress pics since November. I hired out the roof, which was about $1400, but worth not having to risk myself up on the ladder.
Siding going on. Using the Festool to accurately cut out the windows.

Test fit...perfect.

Painting the bit that had already been done when I made the doors. Love the blue, it's a bit darker when not in direct sunlight.


 [/url]
(Since been painted)
So, I have the remaining regular side to do (with one window), and the two upper sections of the tall walls. Was going to get started on that this weekend, but the van isn't empty and I don't feel like paying $20 to rent a trailer. Then, some trim, and it's done.
I also built a faux wall upstairs and got it insulated so that I can bring my wall rack over. Haven't loaded the pics to Flickr yet.
Siding going on. Using the Festool to accurately cut out the windows.
Test fit...perfect.
Painting the bit that had already been done when I made the doors. Love the blue, it's a bit darker when not in direct sunlight.
(Since been painted)
So, I have the remaining regular side to do (with one window), and the two upper sections of the tall walls. Was going to get started on that this weekend, but the van isn't empty and I don't feel like paying $20 to rent a trailer. Then, some trim, and it's done.
I also built a faux wall upstairs and got it insulated so that I can bring my wall rack over. Haven't loaded the pics to Flickr yet.
Does anyone have an idea on how to add soundproofing to a light bedroom door? It goes between a bedroom and the laundry room/ducts to everywhere in the house. So attaching something to to back of the door would be out of the way for the guests and wouldn't be looked at when it mattered. I'm looking for an idea beyond actual waffle sound proofing material because it would be touched and wear down. Maybe frosting spray insulation on plywood and sandwiching it to the door? Thoughts?
Is it a hollow-core door?Does anyone have an idea on how to add soundproofing to a light bedroom door? It goes between a bedroom and the laundry room/ducts to everywhere in the house. So attaching something to to back of the door would be out of the way for the guests and wouldn't be looked at when it mattered. I'm looking for an idea beyond actual waffle sound proofing material because it would be touched and wear down. Maybe frosting spray insulation on plywood and sandwiching it to the door? Thoughts?
If so, you might consider filling it with sound proofing foam and resealing the door. You could replace it with a solid door, which would decrease sound. You could also hang a soundproof curtain or affix some of the rubberized sound reducing tiles or Mass Loaded Vinyl (MLV) to the door.
Also, check door gaps and caulk/rubber strip as necessary to seal gaps.
I've a question about paint:
Got a tub of Valspar V700 to paint a very light grey onto a wall. The wall is currently white. Two coats should do nicely.
In the same room the radiator pipes have been boxed in with plywood. I want to paint this wood the same colour as the wall. If I get the wood equivalent of the paint in the same light grey colour, will it be the same colour as the wall after the usual two coats? Or will it need a trillion coats? Or must I paint it white first?
If it's raw plywood I'd use primer on it first, maybe a couple of coats. I've never seen the "wood equivalent" of a paint though, maybe that has primer in it, guys at the paint store would knowI've a question about paint:
Got a tub of Valspar V700 to paint a very light grey onto a wall. The wall is currently white. Two coats should do nicely.
In the same room the radiator pipes have been boxed in with plywood. I want to paint this wood the same colour as the wall. If I get the wood equivalent of the paint in the same light grey colour, will it be the same colour as the wall after the usual two coats? Or will it need a trillion coats? Or must I paint it white first?
I've a question about paint:
Got a tub of Valspar V700 to paint a very light grey onto a wall. The wall is currently white. Two coats should do nicely.
In the same room the radiator pipes have been boxed in with plywood. I want to paint this wood the same colour as the wall. If I get the wood equivalent of the paint in the same light grey colour, will it be the same colour as the wall after the usual two coats? Or will it need a trillion coats? Or must I paint it white first?
Prime it first and you will be fine. It won't soak it up like a porous material like MDF will.
"Making a particular color" and "hiding what's underneath" are kind of two different jobs for paint. When you end up having to paint something a whole bunch of times, it's because the color was never designed to hide what's underneath. They assume you're painting over an ideal surface, and then two coats of color should be perfect to make everything look nice and even.I've a question about paint:
Got a tub of Valspar V700 to paint a very light grey onto a wall. The wall is currently white. Two coats should do nicely.
In the same room the radiator pipes have been boxed in with plywood. I want to paint this wood the same colour as the wall. If I get the wood equivalent of the paint in the same light grey colour, will it be the same colour as the wall after the usual two coats? Or will it need a trillion coats? Or must I paint it white first?
The first paint you linked says that it's a paint-and-primer two-in-one. The wood-equivalent paint makes no such claim, so it probably isn't.
I would prime the wood with two coats of oil-based stainblocker primer. That stuff is super-hardcore and I've never seen anything that it can't turn into an ideal surface (and I've seen a wall that had profanities written on it with black permanent marker). Once you've primed it real good, you shouldn't need any specialty wood-equivalent paint.
That first paint you linked might be overkill, but it should produce a quality result with less fuss.
Holy moly, working on a table for a friend. Working with epoxy in summer is much different than winter. The epoxy got so hot it almost burned my fingers, it melted the plastic cup it was in and in an instant it cured to a soft barely pliable gel, well on its way to curing hard.
I'll have to work faster next time.
I'll have to work faster next time.
"Plumber's putty". It's like play-doh, and you pull some out of the container, smoosh it around in your hands a lot until it gets nice and soft and flexible, and then you use your expert kindergarten skills to shape it into a long, thin snake, and apply it in an oval around the base of the new faucet fixture which you're going to install.Just a brief question:
I'm going to have to replace the faucet on a bathroom sink. Is it customary to always seal around the base with silicone caulk or something or do some people not do that anymore?
Place the faucet in place, smoosh it down a little, hop under the sink and tighten the nuts to secure the faucet in place. Climb out from underneath and look up top, and you should see a bunch of plumber's putty oozing out from underneath the faucet. Scoop that excess up and put it back in the can (it's still good, so long as it's clean).
Now you should have a waterproof seal covering the entire area between the faucet and the sink. No silicone necessary.
Thanks for the advice. I'll look for some of that at Home Depot tomorrow."Plumber's putty". It's like play-doh, and you pull some out of the container, smoosh it around in your hands a lot until it gets nice and soft and flexible, and then you use your expert kindergarten skills to shape it into a long, thin snake, and apply it in an oval around the base of the new faucet fixture which you're going to install.
Place the faucet in place, smoosh it down a little, hop under the sink and tighten the nuts to secure the faucet in place. Climb out from underneath and look up top, and you should see a bunch of plumber's putty oozing out from underneath the faucet. Scoop that excess up and put it back in the can (it's still good, so long as it's clean).
Now you should have a waterproof seal covering the entire area between the faucet and the sink. No silicone necessary.
I ordered this faucet: https://www.amazon.com/gp/product/B01N3210U1/ref=oh_aui_detailpage_o00_s00?ie=UTF8&psc=1
Looking at the ventral view, it appears that while the thing is fully metal, rather than chromed plastic like others, the base is pretty thin all around. Is that going to be a problem or do I just let a little more than usual get squished out and hope for the best?
It's all good. Almost every faucet I've seen comes with a simple plastic base. This particular manufacturer removed it for the photos to show off the metal insides. Someone even asked in the questions if it has a plastic base, and one of the previous customers confirmed that it does.Thanks for the advice. I'll look for some of that at Home Depot tomorrow.
I ordered this faucet: https://www.amazon.com/gp/product/B01N3210U1/ref=oh_aui_detailpage_o00_s00?ie=UTF8&psc=1
Looking at the ventral view, it appears that while the thing is fully metal, rather than chromed plastic like others, the base is pretty thin all around. Is that going to be a problem or do I just let a little more than usual get squished out and hope for the best?
Edit: A picture's worth a thousand words.

The white plastic thing goes between the faucet and the sink. Prevents the faucet from scratching the sink. Water can't run up it into the faucet.
The plumbers putty will squish into a nice waterproof bed between that plastic and the sink.
Last edited:
OP
OP
With the last 5 bathrooms I've done, I've never one needed anything extra between the tap and the basin or bath. They all came with some kind of seal built in which has worked as intended.
The guy that installed one of our shower trays decided to ignore the very clear instructions and use some silicone to help seal the drain to the trap. It didn't work. Removed the silicone and the in built rubber seals sorted it perfectly.
Only place I put caulk is between the basin and the wall/tiles behind, and around the bath/shower as normal. Shouldn't need it anywhere else.
I finally cleaned out the cabinet under the sink to open up my workspace. Now one huge problem...I can't turn the hot water shutoff valve. I guess I could take a wrench and try to torque it around a bit, but I'm afraid I'll somehow just end up snapping off the whole wall pipe and flooding stuff. I don't want to shut off the entire house if I can help it, partly because I once tried to turn the valve there and couldn't turn that either. Is there some relatively safe way to try to force the valve?
As for the putty, I've got it in hand, so I suppose I'll just use it anyway. It says not to use it on plastic, and the base of the faucet is plastic, but I suppose that's more because it could stain the plastic and I don't really need to care if something that is meant to never be seen is stained? It also says not to use it on marble, and while the basin looks marble-ish, I'm guessing a colonial built in the 70s for what was then a lower-middle class demographic probably isn't using real marble.
As for the putty, I've got it in hand, so I suppose I'll just use it anyway. It says not to use it on plastic, and the base of the faucet is plastic, but I suppose that's more because it could stain the plastic and I don't really need to care if something that is meant to never be seen is stained? It also says not to use it on marble, and while the basin looks marble-ish, I'm guessing a colonial built in the 70s for what was then a lower-middle class demographic probably isn't using real marble.
I would get a retrofit shutoff valve like one (or two) of these.I finally cleaned out the cabinet under the sink to open up my workspace. Now one huge problem...I can't turn the hot water shutoff valve. I guess I could take a wrench and try to torque it around a bit, but I'm afraid I'll somehow just end up snapping off the whole wall pipe and flooding stuff. I don't want to shut off the entire house if I can help it, partly because I once tried to turn the valve there and couldn't turn that either. Is there some relatively safe way to try to force the valve?
https://www.homedepot.com/p/BrassCr...urn-Straight-Ball-Valve-KTCR11FX-C1/203309315
Shut off the water anywhere that it'll shut off (like at the hot water tank), remove the old faucet hose, and snug this on where the hose used to be. If the old valve is stubborn and wants to stay open, let it stay open. This new valve can do the opening and closing. Much cheaper than calling a plumber to replace or rebuild an old valve.
If you can't shut the water off anywhere, then that's a bigger problem. You need to be able to shut things off in case something bursts. I don't think I could say how much force you'd need to get a stuck valve moving, or how much too much force would be.
hi diy era, I need your help with an idea.
I do calisthenics training and want to build a solid pull up bar for pull ups, levers, muscle ups, mounting gymnastic rings and so on. I've used a $40 pull up station from amazon so far but it's flimsy and the bars are thin and uncomfortable to grip with my hands.
I'm looking to upgrade and this is what I have in mind:

The initial plan was to build it on a patch of land which would involve digging holes and pouring concrete but then I thought maybe I could just tie the timber frame to these steel beams in front of my house. I'm thinking a few ridges to keep the ropes in place but otherwise it seems to me the thing should be stable. Super easy to install and painless to remove - sounds perfect to me. So I'm wondering, is this thing a bad idea?
Another idea is to use some kind of mounting that would attach the bar directly to the steel beam. I know there are round ones - the kind used for scaffolding but is there anything off the shelf that will go around a rectangular beam and be stable enough to support a person swinging on the bar?
I do calisthenics training and want to build a solid pull up bar for pull ups, levers, muscle ups, mounting gymnastic rings and so on. I've used a $40 pull up station from amazon so far but it's flimsy and the bars are thin and uncomfortable to grip with my hands.
I'm looking to upgrade and this is what I have in mind:
The initial plan was to build it on a patch of land which would involve digging holes and pouring concrete but then I thought maybe I could just tie the timber frame to these steel beams in front of my house. I'm thinking a few ridges to keep the ropes in place but otherwise it seems to me the thing should be stable. Super easy to install and painless to remove - sounds perfect to me. So I'm wondering, is this thing a bad idea?
Another idea is to use some kind of mounting that would attach the bar directly to the steel beam. I know there are round ones - the kind used for scaffolding but is there anything off the shelf that will go around a rectangular beam and be stable enough to support a person swinging on the bar?
I got a question for you. I was at someone's house today looking at a planer and his asking price was 300€. Planer is a 30-40 year old German planer. Table is 1.5 meters long, 40cm wide. All cast iron. The motor is a beast, 380v around 2 horse power. Previews owner died but he was using it till the end and basically build his house with that thing. I wonder if I should buy it, any of you having any experience with planers you wanna share? It's my first planer but I want to buy one that lasts.
The planer is seen here:
https://www.ebay-kleinanzeigen.de/s...ampaign=socialbuttons&utm_content=app_android
Thanks for the advice
The planer is seen here:
https://www.ebay-kleinanzeigen.de/s...ampaign=socialbuttons&utm_content=app_android
Thanks for the advice