List of Missable Scans in the Game
  • Lady Bow

    Member
    Nov 30, 2017
    11,405
    So it's been a while… am I correct in remembering that there's no missable items/power-ups, but there are missable log entries? It's mostly the bosses I need to remember to scan?

    VIII. Limited-Time Scans

    *******************************************************************************
    -- --
    Pirate Data
    -- --

    01. Fall of Zebes
    -Is located in the Biohazard Containment in the Space Frigate at the
    start of the game. Once the Frigate is destroyed, it is no longer
    possible to obtain the entry.

    -- --
    Creatures
    -- --

    01. Parasite
    -Are located in the Space Frigate at the start of the game. Once the
    Frigate is destroyed, it is no longer possible to obtain this entry.
    There are many scattered around the Frigate and scanning one should be
    no problem.

    12. Ram War Wasp
    -Are located in the Hive Totem in the Chozo Ruins. These appear during
    the battle with the Hive Mecha. Once the Hive Mecha is defeated, it is
    no longer possible to obtain this entry. Simply scan one as they circle
    around you or when they stop.

    13. Barbed War Wasp
    -Are located in the Burn Dome in the Chozo Ruins. These appear during
    the battle with the Incinerator Drone. Once the Incinerator Drone is
    defeated, it is no longer possible to obtain this entry. Simply scan
    one when one emerges from the hive.

    26. Hive Mecha
    -Is located in the Hive Totem in the Chozo Ruins. Once you defeat it, it
    is no longer possible to obtain this entry.

    27. Incinerator Drone
    -Is located in the Burn Dome in the Chozo Ruins. Once you defeat it, it
    is no longer possible to obtain this entry.

    36. Ice Parasite
    -Are located in the Chozo Ice Temple in Phendrana Drifts. These are
    replaced by Pulse Bombus once you acquire the Wave Beam so don't forget
    to scan them.

    37. Ice Shriekbat
    -Found in the Ice Ruins (west) in Phendrana Drifts. These disappear when you acquire the Thermal
    Visor (which is kinda ironic if you think about it).

    40. Ice Burrower
    -Are located in the Plaza Walkway and Research Core Access in Phendrana
    Drifts. These are replaced by Sentry Drones once you obtain the Thermal
    Goggles, I believe. Remember to scan them and don't confuse them with
    the normal Burrowers.

    53. Aqua Drone
    -Are located in the Biohazard Containment in the Crashed Frigate in the
    Tallon Overworld. I'm not 100% on this but apparent they are replaced
    by Aqua Reapers once you leave then come back. Best to scan them as
    soon as you encounter them just to be safe.

    61. Elite Pirate
    -Are located throughout the Phazon Mines. Even though there are several
    of them, they are still in limited number so scan the first one to get
    it out of the way. Once all Elite Pirates have been killed, it is no
    longer possible to obtain this entry.

    62. Phazon Elite
    -Is located in the Elite research in the Phazon Mines. Remember, this is
    a completely different enemy to the Elite Pirates and to Omega Pirate
    and has its own entry. Once you defeat it, it is no longer possible to
    obtain this entry.

    67. Parasite Queen
    -Is located in the Space Frigate. Once you defeat it, it is no longer
    possible to obtain this entry.

    68. Flaahgra
    -Is located in the Sunchamber. Once you defeat it, it is no longer
    possible to obtain this entry,

    69. Flaahgra Tentacle
    -These accompany Flaahgra in the Sunchamber. Many people seem to forget
    about these. Don't make yourself one of them! Once Flaahgra is
    defeated, it is no longer possible to obtain this entry.

    70. Thardus
    -Is located in the Quarantine Cave in Phendrana Drifts. Once you defeat
    it, it is no longer possible to obtain this entry.

    71. Omega Pirate
    -Is located in the Elite Quarters in the Phazon Mines. Once you defeat
    it, it is no longer possible to obtain this entry.

    72. Meta Ridley
    -Is located in the Artifact Temple in the Tallon Overworld. Once you
    defeat it, it is no longer possible to obtain this entry.

    -- --
    Research
    -- --

    09. Map Station
    -Are located in most areas of Tallon IV. Once you have downloaded the
    map from each one, it is no longer possible to obtain this entry. I
    suggest you scan the one on the Space Frigate to get it out of the way.

    16. Missile Door Lock
    -Are located throughout Tallon IV. Once all have been destroyed, it is
    no longer possible to obtain this entry. I suggest you scan the first
    one you come across.

    18. Stalactite
    -Are located in several places in Phendrana Drifts and Magmoor Caverns.
    Once all are broken, it is no longer possible to obtain this entry.
    Simply scan the first one you encounter.

    Metroid Prime Trilogy - Log Book Guide (European) - Wii - By BlitzBoy - GameFAQs

    For Metroid Prime Trilogy on the Wii, Log Book Guide (European) by BlitzBoy.
     
    Last edited:
    Graphical Comparisons
  • EroticSushi

    Member
    Oct 25, 2017
    2,011
    So this is not a remake as rumored right? Is it just a higher resolution port?
    Graphically it's a remake.

    oUG9FbB.jpg
     
    VERY handy Controls Guide! Thank you Solid!
  • Doskoi Panda

    One Winged Slayer
    Member
    Oct 27, 2017
    15,121
    Metroid Prime Remastered control setup guide, y'all. If you're finding yourself overwhelmed by the bevy of options available to you, just keep on reading. I will break down each of the 4 available control schemes, and their individual tuning options, so that you can find the control scheme that's right for you. If you have any questions or need suggestions, just ask me or any of the fine people in this thread.

    Just remember the golden rule - the best control scheme is the one you find yourself having the most fun with. Go with your heart and pick the one that feels just right.

    (a note - I've skipped listing all options relating to remapping buttons - those are pretty straightforward and you can decide on your own if you prefer them or not.)

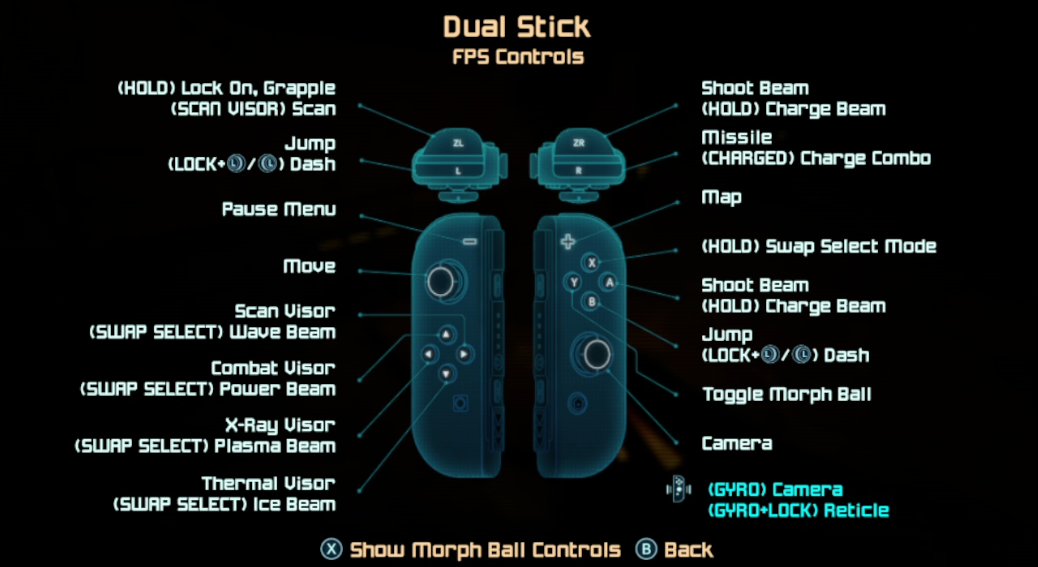
    OPTION 1: DUAL STICK

    dualstickf2itt.png


    The 'default' control scheme, and the one you're likely to be the most familiar with... but also, the first time the Prime series has ever controlled in this way, if you can believe it. Move with LS, turn with RS. This isn't a twitch shooter - you'll be doing a lot of locking on - so don't feel beholden to this setup. That said, this setup does have an impressive array of tuning options:

    Camera - Choose between 'Stick only' and 'Stick + Gyro'. This is how you add Gyro control to the dual stick control setup. Invaluable if you're used to gyro in other handheld, console, or PC shooters.

    Camera Stick X/Y sensitivity - Adjust the sensitivity of right stick camera control.

    Camera Gyro X/Y sensitivity - Adjust the sensitivity of motion controls for camera control (ie, when not locked-on).

    Lock-on Free Aim - This option is cool as hell. When you're locked-on to an enemy, your targeting reticle is locked on, too - dead center in the middle of the screen, as you'd expect lock-on to function. That said, this option allows you to move your targeting reticle anywhere on-screen that you'd like, while the camera remains locked-on to an enemy. This allows you to target specific areas of an enemy, like their weak points, or to account for an enemy's movement while firing - or to even fire on an adjacent enemy without breaking your lock-on. Think GTA 4 style, where you could lock on to an enemy, but flick the stick just slightly upward for a headshot if you had the skill for it. You can choose to control your reticle with Gyro, Stick, or Both - or you can keep this option disabled if you'd rather.

    Stick aim / Gyro aim X/Y sensitivity - If you've activated the Lock-on Free Aim option, these options will become available. Using these, you can adjust the stick or gyro sensitivity for free aim while locked-on.

    Invert X/Y Axis - Flip the right stick horizontal or vertical turning, if that's your thing.

    Spring Ball Sensitivity - Once you've obtained a certain powerup, you can jump in morph ball form by flicking your controller upward. This option lets you adjust the sensitivity of that flick motion.

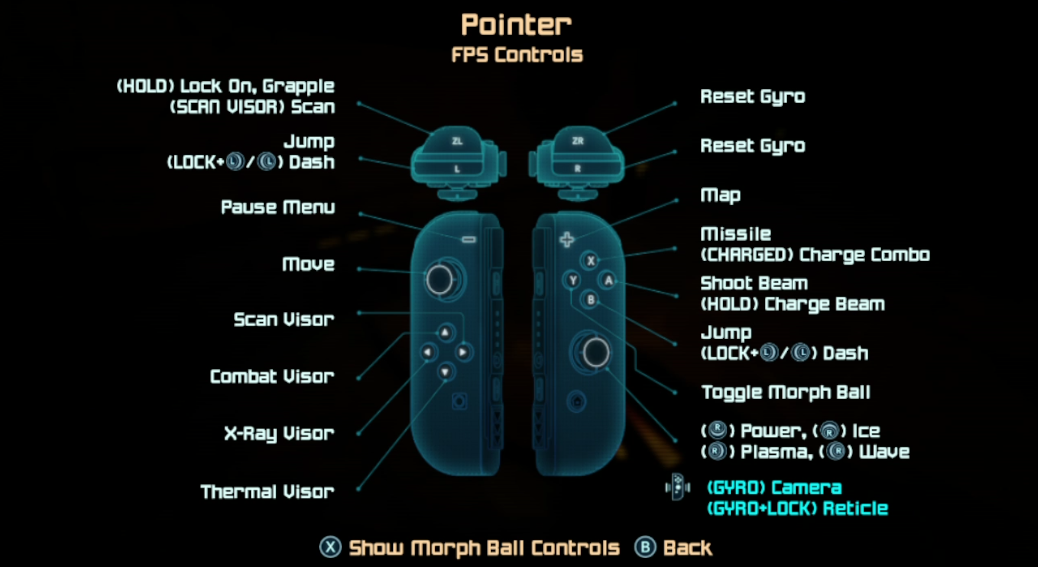
    OPTION 2: POINTER

    pointerqyfsx.png


    This control scheme is an approximation of the Wii's IR 'bounding box' control scheme, originally seen in the Metroid Prime Trilogy Wii ports. You move with LS - and all aiming and turning is controlled via an on-screen gyro-controlled cursor. You can aim anywhere on-screen at any time, and to turn, you simply aim toward the edges of the screen. You might find this setup plays more naturally if you're not a fan of dual stick FPS controls - and, while this setup does not feel exactly the same as it did on Wii, the available tuning options enable you to dial in your preferred camera turn speed and sensitivity, far beyond the range of options available on the Wii originally.

    Camera X/Y sensitivity - Adjust how quickly the camera turns the further you aim the cursor toward the edges of the screen.

    Aim X/Y Sensitivity - Adjust the sensitivity of the on-screen reticle. This option is very cool, because if you're playing docked, and you fine tune it just right, it will feel more like you're pointing directly where you want to aim on-screen.

    Lock-On Free Aim - This option actually originated with the Wii's IR control setup, and as a result it feels very natural when paired with this control scheme (and I believe it's on by default). Enabling this allows you to continue aiming your cursor anywhere on-screen, while your camera remains locked-on to an enemy or object. Thereby allowing you to target weak points or fire upon multiple distinct targets without breaking target-lock. Once again, very cool.

    Spring Ball Sensitivity - Once you've obtained a certain powerup, you can jump in morph ball form by flicking your controller upward. This option lets you adjust the sensitivity of that flick motion.

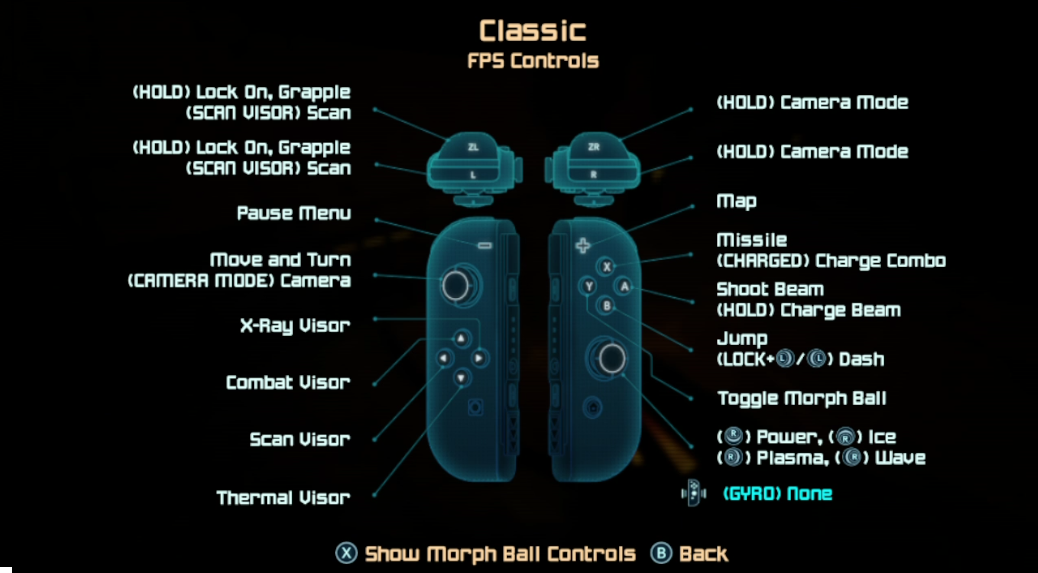
    OPTION 4: CLASSIC

    classic63dbs.png

    There's a reason why I'm skipping option 3 for now, trust me. Anyway, this control scheme is meant to replicate Metroid Prime's original control scheme on GameCube. Metroid Prime originally had 'tank' controls - meaning that the left stick handled both forward and backward movement, and left and right camera control. In order to strafe and aim up or down, you'd need to lock-on or hold the lock-on button. If it sounds cumbersome... it's really not! This is the control scheme that the game was originally designed around, after all... and it didn't stop the game from reaching critical acclaim, or from becoming beloved by an entire generation of Nintendo fan. If you're looking for that classic GameCube nostalgia, or you just can't deal with dual stick or motion control, this is the control setup for you.

    Invert X axis - Invert left stick turning, if that's your thing.

    Camera Stick Sensitivity - Adjust the speed of left stick camera control, up to and well beyond the original game's upper sensitivity limit. Very cool - raising this value high is like playing a 'pro mode' take on the OG controls.

    Spring Ball Sensitivity - Once you've obtained a certain powerup, you can jump in morph ball form by flicking your controller upward. This option lets you adjust the sensitivity of that flick motion.

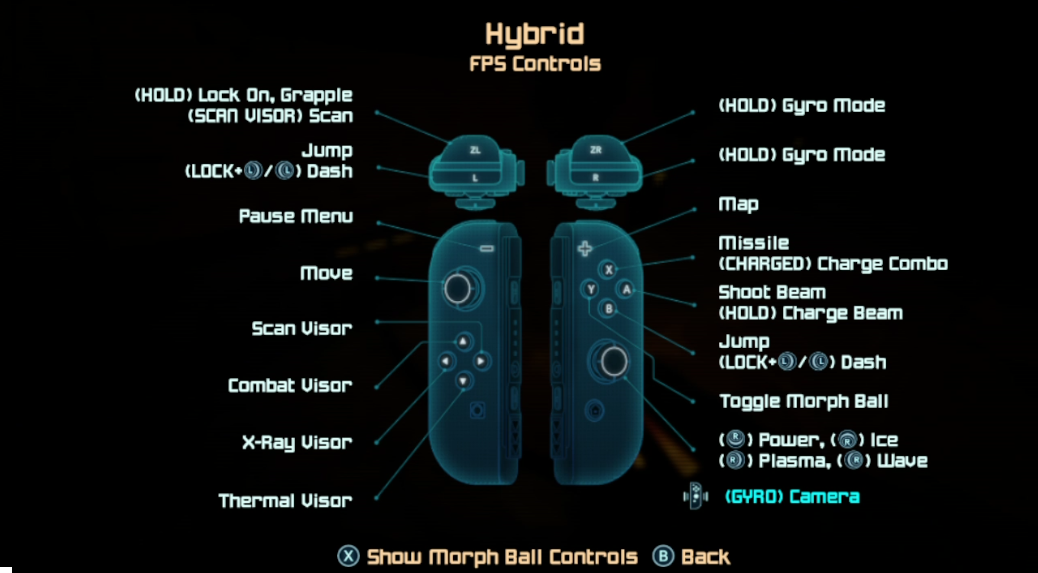
    OPTION 3: HYBRID

    hybridtnixx.png


    This one is weird, but very cool! It's also the option you might have tried to default to, if you were looking for dual-stick + gyro. But that's not what this is. (Use Dual Stick and turn on Gyro if that's what you're looking for.) Nope, it's actually the Classic (GameCube-style) control scheme - but augmented with additional motion controls! If you love the original GameCube control setup, but think it could use a little bit of spicing up, a little added precision and freedom - this is the setup for you! Move with LS, turn with LS... but fine-tune your aim with a little bit of gyro action, and enjoy some Lock-On Free Aim with GameCube style controls for the first time!

    Camera Stick Sensitivity - Adjust the speed of left stick camera control, up to and well beyond the original game's upper sensitivity limit.

    Camera Gyro X/Y sensitivity - Adjust the sensitivity of motion controls for camera control (ie, when not locked-on).

    Lock-On Free Aim - Enabling this allows you to continue aiming your cursor anywhere on-screen, while your camera remains locked-on to an enemy or object. Thereby allowing you to target weak points or fire upon multiple distinct targets without breaking target-lock. For the third time, very cool - and completely novel for GameCube control hardliners and aficionados alike.

    Jump Footing Check - This option, enabled by default, will automatically face the camera downward when Samus jumps. IIRC this was default, untogglable control behavior in the original GameCube version of the game (and this game's Classic control scheme, too), and for good reason - it really does help with platforming! You don't necessarily need it, though - since you can use gyro to do that yourself, now!

    Invert X axis - Invert left stick turning, if that's your thing.

    Spring Ball Sensitivity - Once you've obtained a certain powerup, you can jump in morph ball form by flicking your controller upward. This option lets you adjust the sensitivity of that flick motion.

    ---------------------------------------------------

    Hope this helps anyone who is still trying to work out which control scheme they'd like to use, or anyone on the fence about the game who wants to know exactly what their options are (turns out, your options are MAXIMUM)!

    My personal preference is option 1 - Dual Stick, with gyro. Medium stick sensitivity, low Gyro camera sensitivity, medium Gyro aim sensitivity, Lock-On Free Aim on. But you do you.
     
    Display settings if the game is too dark. Thank you VorpalNonsense!
  • Oct 25, 2017
    14,700
    I don't have an OLED, but it was also incredibly dark for me. I just had to go into the switch system settings and raise the brightness. Still had a little bit of issue, but it was much better afterwards.
    Docked, in a calibrated OLED screen. I've never seen it so dark before, like I am actually missing details from the world.
    Man idk but the game is too damn dark on my OLED. The blacks are super crushed. I'm loosing out on all the details...
    No in game menu settings for it and switch doesn't allow in docked mode. I'll have to manually adjust color settings for this game I feel.
    Yeah it's really dark, should give us a gamma option or just update the ambient light a bit.
    My only minor complaints are:
    - too dark in many areas
    Is there something in game I can do to increase the brightness a bit? I can't seem to find anything. The game looks great but it's a little dark and I'm working off my LGC9 where I have the settings otherwise kind of where I want them.
    Not just you. There are some rooms where I literally have no idea where to walk or jump. I also looked for a setting in the menu but was disappointed to not find one. :/ #oledproblems
    Yeah, this is turning out to be my only complaint with the visuals. There's a particular vertical area in Tallon Overworld (the one with the Beetles at the bottom) that I can't see shit in once I'm halfway up.
    I've had a similar experience and I'm kinda confused about it. When playing on my Vizio OLED, there are dark areas so crushed that like Shona's example I literally don't know where to jump (that same exact spot mentioned gave me trouble).
    Although I played on a different screen in my home for a bit yesterday and could see perfectly well even in corners that were pitch black on my OLED. On this other screen I don't have the brightness cranked up or anything (it's calibrated) so I literally thought they might have patched the game until I looked and still saw V1.0. This difference in behavior warrants further investigation.

    Fake Edit: IF YOUR GAME SEEMS OVERLY DARK IN SOME AREAS WHILE PLAYING ON TV
    Okay so after I wrote the above I did more testing (input modes/cables/devices/etc) and discovered what my personal problem was. My TV was set to YCBCR(limited) color space, while my Switch was set to Automatic (and was apparently outputting Full RGB). I believe YCBCR is typically the norm for gaming, however switching that TV setting to Auto (which caused the tv to choose RGB instead, or by manually switching it to RGB) instantly solved my crushed blacks by matching up the color spaces between the two devices. Blacks are still black but areas of shadow are now full of detail.

    Here below was my test area: The lore corner in the room overlooking the Artifact Temple.
    So just to rule it out, anyone experiencing darkness/crush issues double check your color space settings on both Switch console and TV! (Obviously this doesn't apply to handheld!)
    It may not be what's causing your problem, but it's what was causing mine.

    Before: Switch Automatic (RGB), TV YCBCR (Limited)
    After: Switch Automatic (RGB), TV Automatic (RGB)
    Whether you go with Limited or Full (or Auto), just make sure both are matching up!

    QfAZ7jY.jpg


    I'm a little embarrassed because I'm a bit of a display enthusiast and usually very conscious of these settings. I don't recall ever having this matchup issue with my Switch games before though, that's weird. However a recent TV firmware update scrambled all my display settings, so I don't know about yall but I'll blame mine on that. 😉
     
    Last edited: