Haha, at the time it was "futuristic" to reduce them but yes agreed looking back I liked them.Eliminating scanlines on an amiga is a crime. Your unworthyness was just proven for all to see!
I would have agreed about the flicker though :p
I am towerizing my Amiga 1200
- Thread starter Deleted member 12790
- Start date
You are using an out of date browser. It may not display this or other websites correctly.
You should upgrade or use an alternative browser.
You should upgrade or use an alternative browser.
OP
OP
I did some searching and itv was this pack I was luckily given by my dad

Here is the blurb
http://www.amigahistory.plus.com/a500batman.html
A true treat for Amiga fans. Loved that computer. So good
I have the desktop dynamite pack, which came with Oscar (Which came with my CD32 as well), Dennis the Menace, and coolest of all, Deluxe Paint 4.
Believe it or not I still have use for actual amiga programs. Given that I'm also building a megadrive dev kit, Deluxe Paint is actually a pretty useful program to make Megadrive art with. Many commercial Sega Genesis/Mega Drive games used deluxe paint 4 to create art.
I'm planning on mounting the controller ports onto the front blank bracket on the case so I can have them in the front of the PC, like they are on the A1200 and such. I'm also considering swapping out the black Gotek Floppy Emulator and CD-ROM Drive for beige ones, as I have both colors. I'm also planning on printing some Commodore stickers for the black window portion of my case, and wiring up the LED lights on the front panel. None of the buttons on the PC itself work -- I don't have a reset button attached to my A1200, and the PSU is ATX and thus doesn't connect to the front starter switch, but I was thinking about decorating the reset and turbo buttons with some boing bouncing ball stickers.
What a cool project. The Amiga remains my favorite gaming system of all time ( beside the PC) with the Dreamcast afterwards.
So many classic games I still come back to year after year. In fact in the last few days I have played 4 Amiga games!
It Came From the Desert 1 & 2
Wings
Sensible Soccer
So many classic games I still come back to year after year. In fact in the last few days I have played 4 Amiga games!
It Came From the Desert 1 & 2
Wings
Sensible Soccer
Dang used to love my Amiga 500 but guess it stopped working one day or something... Wish I kept up with it kinda
If you wire the ATX psu to the poweron switch and wire it to your Amiga 1200 (using the Amiga 1200 power cable) you can power on your Amiga through the tower's power button.I'm planning on mounting the controller ports onto the front blank bracket on the case so I can have them in the front of the PC, like they are on the A1200 and such. I'm also considering swapping out the black Gotek Floppy Emulator and CD-ROM Drive for beige ones, as I have both colors. I'm also planning on printing some Commodore stickers for the black window portion of my case, and wiring up the LED lights on the front panel. None of the buttons on the PC itself work -- I don't have a reset button attached to my A1200, and the PSU is ATX and thus doesn't connect to the front starter switch, but I was thinking about decorating the reset and turbo buttons with some boing bouncing ball stickers.
My teenage years were formed by my parent's Amiga 2000 with pc board.
So many memories.
Funny thing, in more ways than one, In owe the Amiga my professional career (I was hired by a small video prod office as a graphic artist/ video editor due to my knowledge of genlocking and titling/ graphics on Amiga).
OP: really really cool project. Can't wait to see where it's going.
OP
OP
If you wire the ATX psu to the poweron switch and wire it to your Amiga 1200 (using the Amiga 1200 power cable) you can power on your Amiga through the tower's power button.
Maybe eventually, for now I'm fine with reaching in the back. I have an emmerson 8088 right next to the Amiga and it had a power switch in the back since we got it. Besides, I was mainly talking about the buttons on the left hand side where the LEDs are, that are labeled "Turbo" and "Reset." Those are round and a different color so they stick out against the black. The Power Switch is an AT-style switch that is molded into the opposite side and is basically invisible, so I don't really mind it.
I'm thinking I'll eventually wire up a reset button and put those two buttons to reset, but in terms of aesthetics I think I might want to make them look like boing balls.
I'm also thinking about putting a small sticker of thi on the lower right hand corner of the machine, on corner of the big white bay:

Is that too tacky? I don't exactly have an Amiga badge for the PC.
I did some searching and itv was this pack I was luckily given by my dad
Here is the blurb
http://www.amigahistory.plus.com/a500batman.html
A true treat for Amiga fans. Loved that computer. So good
Ah yeah, the barman pack. I remember working as a paperboy in the uk to buy this exact pack over a year - f/a interceptor and batman were amazing. I remember having to use your batarang to throw the joker into an acid vat on the first level.
OP
OP
The A500 (not counting Chucky Egg on the Acorn Electron) was the computer that really got me into gaming.
What games do you like to play on the thing?
Oh man I have a ton of really great Amiga games. My favorites would have to be Lionheart, R-Type, Monkey Island, Zool 2 CD, Chuck Rock 2, Turrican 2, Shadow of the Beast 3, Fightin Spirit, Fire n Ice, James Pond 2.... I could keep going on lol. I have over a hundred Amiga 500, 1200, and CD32 games.
The Amiga 500 is really the starting point for my love of gaming. I had a Spectrum and a few other devices before that but the Amiga was certainly the one that had the most impact.
Point and click games in particular were massive favourites but also games like Batman (had an Ocean pack containing Batman, Ghostbusters 2, RoboCop and Back to the Future 2) and the Dizzy series of games. Spent hours guiding that egg around various places haha.
Nice work man, real labour of love. Also nice to see just how many other people have fond memories of Amiga too.
I'm not sure iBrowse 2.4 would be able to load the forum :P Or even Netsurf
Awesome thread, I rode my Amiga till it was beyond dead as a company.
I had a HDD, Genlock, disks and disks of stuff and loved creating with Deluxe Paint and later Lightwave, it's why I do what I do now.
I had a HDD, Genlock, disks and disks of stuff and loved creating with Deluxe Paint and later Lightwave, it's why I do what I do now.
I'm also thinking about putting a small sticker of thi on the lower right hand corner of the machine, on corner of the big white bay:
Is that too tacky? I don't exactly have an Amiga badge for the PC.
I'd go for the original logo over the reboot.
A500 is the greatest games machine I ever owned. I owned a Spectrum before that, but it was the Amiga that made me fall in love with videogames.
Really cool project, congrats man. I've been tempted to buy myself an Amiga for a while now, but I'm going to have to settle for emulation because I have no space for another computer.
Really cool project, congrats man. I've been tempted to buy myself an Amiga for a while now, but I'm going to have to settle for emulation because I have no space for another computer.
Nice work OP!
As others have already said, I think OS 3.9 is way too bloated for a real Amiga, I'd stay with 3.5 and even with that, I'd probably keep at least two different boot partitions, heck maybe even three with one having a minimal S:startup-sequence
This way you have a gaming friendly boot option that leaves a lot of RAM available for installed games (whdload and the like)
Damn I love that machine AND its operating system.
A MiST (fpga based amiga computer) takes about as much space as a book :pA500 is the greatest games machine I ever owned. I owned a Spectrum before that, but it was the Amiga that made me fall in love with videogames.
Really cool project, congrats man. I've been tempted to buy myself an Amiga for a while now, but I'm going to have to settle for emulation because I have no space for another computer.
That's some awesome work Krejlooc! Haha, and to think I felt proud setting up a good WinUEA setup on my Mac so that I can play games in smooth 60FPS in NTSC mode, instead of seeing skips induced by 50->60FPS conversion - and have now purchased a Pi3 that I plan to convert into a mini Amiga, using this case. Your work here puts my puny efforts in perspective, that's for sure.
You know, even more awesome is that you're not driven by nostalgia, but have gained appreciation for Amiga only later in your life. It was really such an incredible computer, and the demo scene for it is to this day seriously impressive. I remember selling C64 to fund A500, then sold A500 to fund A1200, then sold that (with great hesitation) to fund some stupid Pentium PC. In hindsight, I regret it all, but I just didn't have money at that time to buy without selling first.
You know, even more awesome is that you're not driven by nostalgia, but have gained appreciation for Amiga only later in your life. It was really such an incredible computer, and the demo scene for it is to this day seriously impressive. I remember selling C64 to fund A500, then sold A500 to fund A1200, then sold that (with great hesitation) to fund some stupid Pentium PC. In hindsight, I regret it all, but I just didn't have money at that time to buy without selling first.
NetSurf on macOS crashes out when you try to go here.
Oh man I have a ton of really great Amiga games. My favorites would have to be Lionheart, R-Type, Monkey Island, Zool 2 CD, Chuck Rock 2, Turrican 2, Shadow of the Beast 3, Fightin Spirit, Fire n Ice, James Pond 2.... I could keep going on lol. I have over a hundred Amiga 500, 1200, and CD32 games.
It's been a long long time since I played the games, but what I remember putting the most time into were Batman The Movie, (I too got the Batman pack) Robocop 3, Chase H.Q, New Zealand Story and Elite 2.
I will go to my grave remembering the cheat code for Batman. 'jammmmmmmmmmm'
Whatever you do, don't do this.
Is that too tacky? I don't exactly have an Amiga badge for the PC.
The Commodore logo stayed classy, the Escom logo never was.
The Pi isn't a good setup for amiga computing. If you really want to go down the emulation path/road and keep it to a super minimal space setup, go for either an odroid xu4 one or a mist fpga one (but pricier)That's some awesome work Krejlooc! Haha, and to think I felt proud setting up a good WinUEA setup on my Mac so that I can play games in smooth 60FPS in NTSC mode, instead of seeing skips induced by 50->60FPS conversion - and have now purchased a Pi3 that I plan to convert into a mini Amiga, using this case. Your work here puts my puny efforts in perspective, that's for sure.
You know, even more awesome is that you're not driven by nostalgia, but have gained appreciation for Amiga only later in your life. It was really such an incredible computer, and the demo scene for it is to this day seriously impressive. I remember selling C64 to fund A500, then sold A500 to fund A1200, then sold that (with great hesitation) to fund some stupid Pentium PC. In hindsight, I regret it all, but I just didn't have money at that time to buy without selling first.
A MiST (fpga based amiga computer) takes about as much space as a book :p
That I didn't know. Thanks. Unfortunately it wouldn't scratch my itch as I'd be wanting an original if I did splash out, for nostalgia's sake. It'd be far easier to get the MiST past my girlfriend though.
Wow, if I had known about that xu4, i'd go for that over Pi3. Price difference is minimal. I am however drawn by that small case I linked above :) But yeah, I am worred as how quick the emulation is going to be. I have Pi0, and practically nothing amiga-related runs properly on it. It's just too slow.The Pi isn't a good setup for amiga computing. If you really want to go down the emulation path/road and keep it to a super minimal space setup, go for either an odroid xu4 one or a mist fpga one (but pricier)
Oh, and I would love that MIST FPGA board, but it's a bit hard to justify the price. Then again I spend more on games that just end up sitting in the backlog.
Uh, I didn't know that!The Pi isn't a good setup for amiga computing. If you really want to go down the emulation path/road and keep it to a super minimal space setup, go for either an odroid xu4 one or a mist fpga one (but pricier)
Would you kindly (briefly) explain why the Pi isn't a good choice please?
Great project, OP. I look forward to seeing more.
I lived my Uncles Amiga - great gaming memories!
I lived my Uncles Amiga - great gaming memories!
I have the desktop dynamite pack, which came with Oscar (Which came with my CD32 as well), Dennis the Menace, and coolest of all, Deluxe Paint 4.
Believe it or not I still have use for actual amiga programs. Given that I'm also building a megadrive dev kit, Deluxe Paint is actually a pretty useful program to make Megadrive art with. Many commercial Sega Genesis/Mega Drive games used deluxe paint 4 to create art.
I'm planning on mounting the controller ports onto the front blank bracket on the case so I can have them in the front of the PC, like they are on the A1200 and such. I'm also considering swapping out the black Gotek Floppy Emulator and CD-ROM Drive for beige ones, as I have both colors. I'm also planning on printing some Commodore stickers for the black window portion of my case, and wiring up the LED lights on the front panel. None of the buttons on the PC itself work -- I don't have a reset button attached to my A1200, and the PSU is ATX and thus doesn't connect to the front starter switch, but I was thinking about decorating the reset and turbo buttons with some boing bouncing ball stickers.
That's a really cool project. Am impressed with the idea. The Amiga deserves more love. Top top marks chap. Please post pics when your done as would be awesome to see the finished project.
Ah yeah, the barman pack. I remember working as a paperboy in the uk to buy this exact pack over a year - f/a interceptor and batman were amazing. I remember having to use your batarang to throw the joker into an acid vat on the first level.
I played batman and managed to get all the way to the very last level. Was so so close to finishing it. You also had to use the grappling hook to make turns in the batmobile. Interceptor was epic also. Thing is my elder cousin had the Amiga 500 about 6 months before me and I quickly got a ton of extra games through x-copy so never went back to batman to finish it. One of my regrets in life no doubt!
This thread is giving me urges to try and acquire an old tandy as that was my first computer... but I can only imagine the hassle that would be both in acquiring and setting up and then trying to modernize it. I just don't have the time and money for that kind of thing, so in the mean time I'll just live vicariously through threads like this.
It's just not powerfull enough (and truth be told, while AmiBerry is a good effort, it's not quite there yet). It is slow, graphics are glitchy, sound is poor and so onUh, I didn't know that!
Would you kindly (briefly) explain why the Pi isn't a good choice please?
OP
OP
So ive ordered a prisma megamix music card for my amiga. Its a card that communicates through the clock port and decodes mp3s for the amiga.
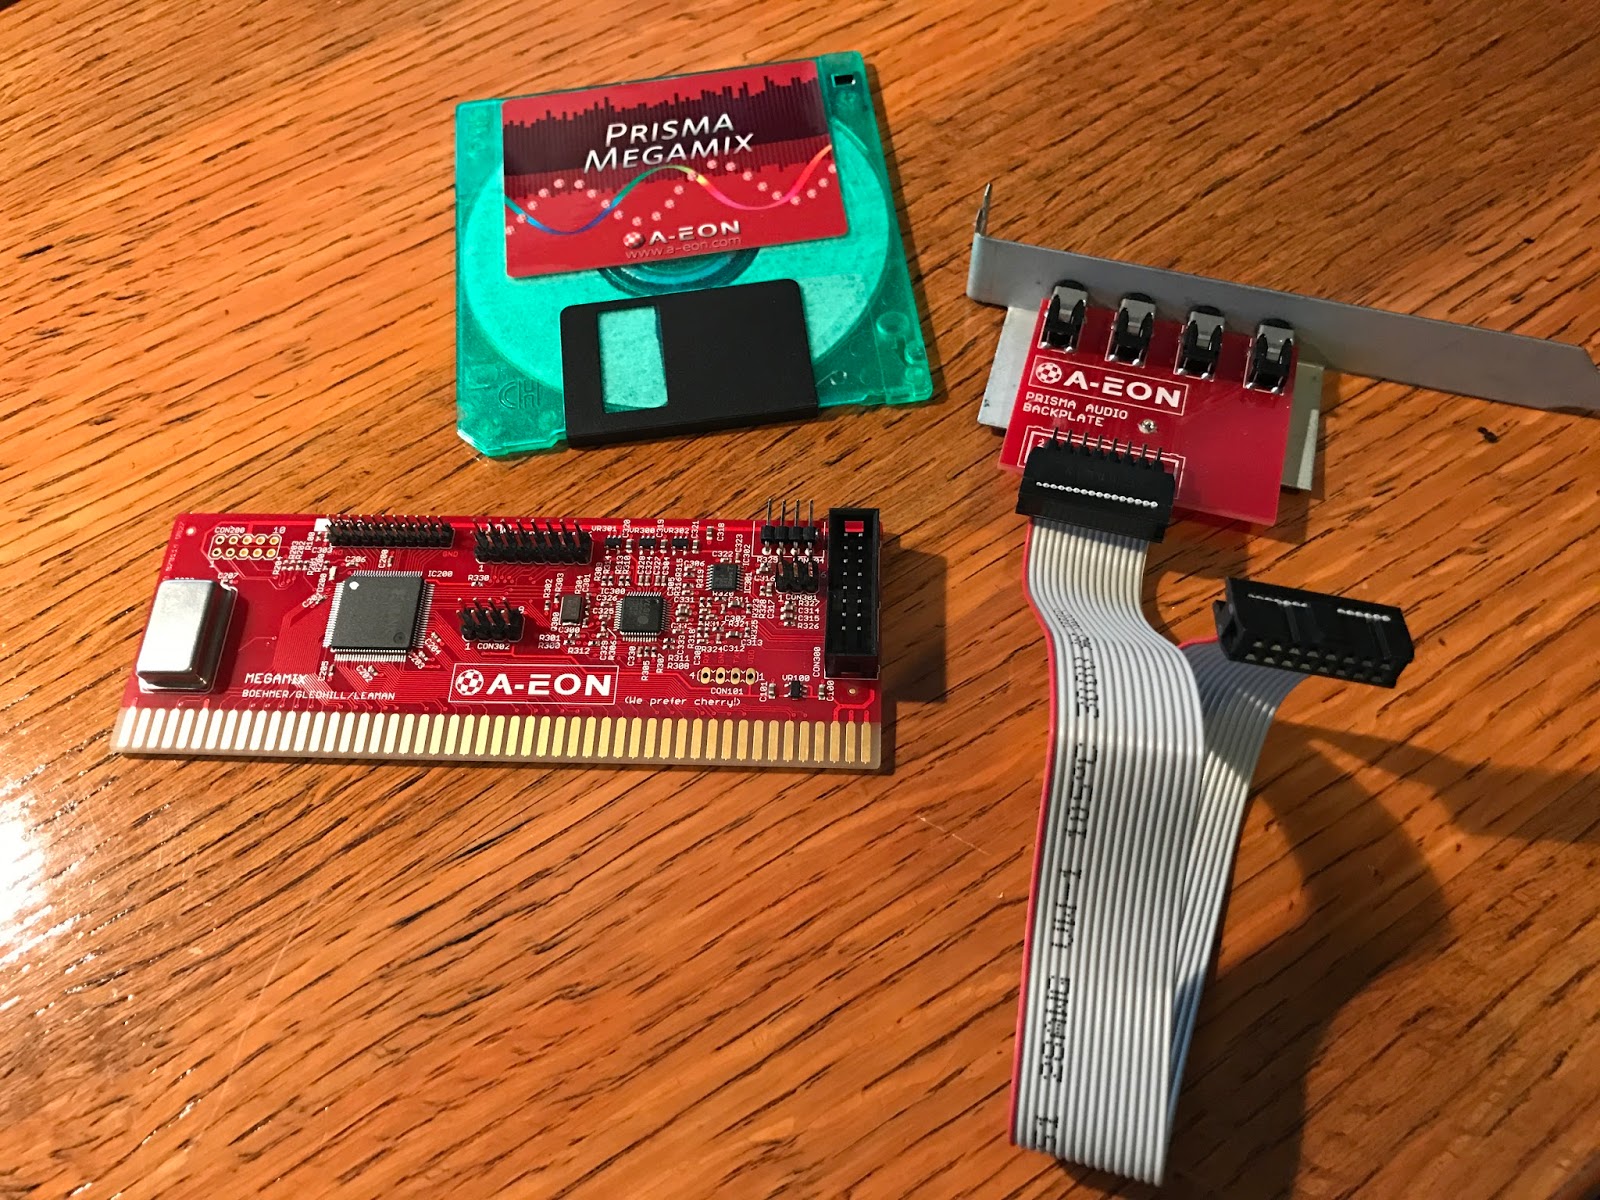
I could just use a normal sound blaster sound card through the mediator, but thus feels like a more "amiga" like solution.
I could just use a normal sound blaster sound card through the mediator, but thus feels like a more "amiga" like solution.
Towering an Amiga 1200 is a bit like making an Amiga 4000, right?
Never had much chance to play with Amigas in my youth, despite my uncle having a lot of Amiga gear. He used a program called Scala (a bit like PowerPoint) to run an Info Channel for his cable company, and I remember gawking at just how many computers he had. At the time I didn't really know that those Amigas were anything different than a normal PC, not helped by a friend of mine having a Commodore PC. My uncle probably threw all that stuff in the trash.
I did know that the Amiga 500 wasn't a PC. It's design was very "Commodore 64" like, so I figured it was the next best thing up from that. Everyone I knew who had one of those heaped abuse on the poor things. I recall wondering how those things held up. In contrast our 386 laptop was treated with silken gloves, and died regardless.

god I love that Commodore monitor so much. we had one in our house until at least 2003 or 2004. used it to play Nintendo, SNES, and Genesis games, and it was a small TV for the "computer room" we had in the back. hook it up to a VCR and run the cable through that... voila, local baseball games on in the background while I goofed around in Photoshop on dad's computer. that thing was rock solid.
OP
OP
That Tac-2 controller is awesome. It took me many years to really adapt to 1-button gameplay when I picked up the Amiga, being American, but controllers like the Tac-2 made it all make sense. Up-to-jump is something that only really works if you're using a joystick like that, holding it in your hand.
My favorite amiga controller is the Cheetah Bug:

Although I need to repair mine.
Surprisingly, I'm not a huge fan of the ubiquitous Competition Pros, although I like the micro-switched alternative Zip Sticks. I have a clear-blue and silver Competition Pro that uses microswitches that feels great, though.
I also have some Amiga Gravis Gamepads which are awesome, because they include a switch to map Up and Down to buttons on the pad in place of the rapid fire buttons. And I have a bunch of CD32 controllers, both the terrible stock kind, and the awesome honeybee kinds:

Nah :P, main problem was up on the Amiga was jump.I loved arcade sticks and best we could get at the time was zipstick or Competition Pro sticks.I hate classic joysticks. I only gamed using my SMS or MD pads on both my ST and Amigas
Actually, I still do. My main pad is a 3 buttons MD pad
Will definitely admit though I longed for a joypad later on as more games supported 2 separate fire buttons. The older sticks had 2 fire buttons but they both registered as the same one. I need to get a pad for my A1200 just so I can play some of the CD32 only games. I have 2 decent dual button sticks now :)
Yeah the 1702 has an amazing picture. (Especially with s-video) I bought mine about a year back on Craigslist for about $40 And I have used it for my older gaming consoles and it looks really clear.(ps2, Xbox, wiiu, retropi)
It also convinced me to get an older 34" Sony CRT HDTV (even has HDMI on it) for my consoles and another 20" Sony CRT SDTV (Both are trinitrons)
It also convinced me to get an older 34" Sony CRT HDTV (even has HDMI on it) for my consoles and another 20" Sony CRT SDTV (Both are trinitrons)
god I love that Commodore monitor so much. we had one in our house until at least 2003 or 2004. used it to play Nintendo, SNES, and Genesis games, and it was a small TV for the "computer room" we had in the back. hook it up to a VCR and run the cable through that... voila, local baseball games on in the background while I goofed around in Photoshop on dad's computer. that thing was rock solid.
Last edited:
OP
OP
So I put in some effort and have the Amiga mainly wired up in the case:

I first put down some packing tape on the bare metal to prevent any sort of accidental short, then drilled in and installed risers in multiple locations matching the Amiga board and ACA 1233n accelerator (which also has screw mounts). Then I ran the wire for the keyboard port and installed it in the appropriate spot on the case, taping the keyboard wire down to keep clutter out.

I drilled some holes in the case and routed the ATX->Amiga power supply converter cable around the edge of the case using zip ties. I need to manually mix the audio from 3 different sources on the amiga - I need to mix the paula output and the CD-ROM Drive output together, which I do using a bracket that contains some electrical parts to amplify the volume. That bracket expects the Paula out to come in via RCA jacks, so I've run RCA cables from the audio-out ports on the Amiga to an RCA jack that I feed through a PCI Bracket with a hole in it. I tied up the excess audio cable and zip tied it to keep it clean.

The CD-ROM Drive is mounted. I went with a beige one instead, thinking it felt more 1990's. There used to be a bracket that was riveted onto the case that went on the left side of the CD-ROM drive that provided screw holes for it, along with screw holes for the right side of the floppy drive bays. But that bracket was right in the middle of where I needed to mount the Amiga 1200 motherboard, so I had to remove it. This means that the CD-ROM Drive is held entirely by the right side of the case. This isn't that bad, though, as there are 4 screw mounts on that side and there is also a slight shelf for the CD-ROM drive to sit on. With all 4 screws mounted, the drive is solid and isn't really going anywhere. Additionally, the CD-ROM drive face sticks out quite a bit, and actually rests on the molded plastic of the front of the case, which is screwed into a metal plate.

I spent a little bit of time playing origami to get the ribbon cable properly laid in the case. By pressing tightly with my thumb at the folds, I could get it to lay down stiffly in the case.

I also lopped off all the excess and unused ports on my spare PSU that I'm using for the project, because they contributed a significant amount of clutter in the case. I coated the tips of these cuts in hot glue to prevent accidental shorting.

I want to have two floppy drives - the first an actual Amiga floppy drive, and the second a Gotek Floppy Drive emulator, but i only have one 2.5" IDE port and cable. Luckily, a few years ago, I picked up this hacked up cable from a guy on AmiBay. It plugs into the floppy drive port on the back of the Amiga and outputs to a standard 2.5" IDE cable and power connection.

I have the cable permanently installed into the floppy port under the CD-ROM drive. Again, hot glue on exposed terminals to prevent shorting.

In the front of the case, I managed to install the Amiga LED plate in the exact spot where a window existed for a Turbo Speed LCD Display prior. The case would hook up to old motherboards with turbo buttons on them and output the speed of the 286 or whatever was connected, so the user would know if they were operating at 16 mhz or 66 mhz or whatever.

You can see the 3 LEDs just barely poke in through the window. Tried turning it on and all 3 are clearly visible.

I want to print out a sticker to place over that entire front panel. This is a mock up of what I'm currently playing around with. The boing balls would be stickers to place on top of the reset buttons, while the white squares would be cut out to align with the LED spots on the window. I need to make sure the measurements are correct, but feedback is welcome.

I went ahead and installed a modern SATA HDD with just some L-brackets to mount it to the case. This will make attaching the HDD to a modern PC easier for me (as I have a SATA->USB adapter) which will let me use WinUAE to easily partition and install stuff on the HDD.

I'm using a SATA->PATA adapter for this. I haven't actually tested to see if it works with the Amiga, but I assume it should. I've used it in retro 486 PCs before without issue. If anybody knows if this is going to cause a problem, please speak up. I don't want to use CF kits unfortunately. This is being fed into a quad-buffered IDE interface I posted earlier. Before, I had tested it out with a 8 gb PATA drive and got it recognized under workbench, so I'm hoping for no problems with this SATA->PATA HDD.

Got the Floppy Drive and the Gotek Floppy Drive emulator installed. They go into a cage that you screw into the case. The left half of the cage is held by a metal bar that spans the width of the PC case, giving additional support to the top of the case (which is strong enough to hold a CRT monitor). The cage screws into the top of this metal bar. The other side of the cage was supposed to screw into that riveted bracked I removed earlier. However, to an even greater degree than the CD-ROM Drive, both the gotek floppy drive emulator and the real floppy drive stick way out of the front of the case, resting on both the plastic and the metal. And I've tried putting everything in the other way around and it's the same way. It seems the drives are supposed to actually stick out this much on this case, which is fine as it provides a ton of stability and support to the floppy drive. Overall, all the drives in the case are firmly mounted and not moving, despite removing that bracket.

The wiring is still pretty clean. I'm playing around with bracket locations on the back to see what kind of configuration I like best. I'm still waiting for a parallel cable and a 25pin serial cable to arrive for me to mount. Ultimately, I think I will forgo putting the mediator in as there is no real need anymore. I was planning on using flex PCI risers to work with the mediator, but my main reason for getting a mediator was to install a soundblaster card with. However, I have a prisma megamix music card coming in which accomplishes the same goal I was going for -- MP3 playback, that I don't feel the need anymore.
I also am waiting on a second angle adapter for my PCMCIA port so I can install the wireless adapter. But, unfortunately, both the prisma music card and the angle adapter are in the mail and thus I'm pretty much at a stand still.
EDIT: Regarding the large white bay in the front:
I have decided that I am going to mount the controller ports to the front of that bay on one side, and then on the other I want to put an Amiga logo sticker.
Since virtually everybody thinks the post-death logo is trash, how about this one instead:

BTW sorry if some of the photos are blurry. Phone-hands.
I first put down some packing tape on the bare metal to prevent any sort of accidental short, then drilled in and installed risers in multiple locations matching the Amiga board and ACA 1233n accelerator (which also has screw mounts). Then I ran the wire for the keyboard port and installed it in the appropriate spot on the case, taping the keyboard wire down to keep clutter out.
I drilled some holes in the case and routed the ATX->Amiga power supply converter cable around the edge of the case using zip ties. I need to manually mix the audio from 3 different sources on the amiga - I need to mix the paula output and the CD-ROM Drive output together, which I do using a bracket that contains some electrical parts to amplify the volume. That bracket expects the Paula out to come in via RCA jacks, so I've run RCA cables from the audio-out ports on the Amiga to an RCA jack that I feed through a PCI Bracket with a hole in it. I tied up the excess audio cable and zip tied it to keep it clean.
The CD-ROM Drive is mounted. I went with a beige one instead, thinking it felt more 1990's. There used to be a bracket that was riveted onto the case that went on the left side of the CD-ROM drive that provided screw holes for it, along with screw holes for the right side of the floppy drive bays. But that bracket was right in the middle of where I needed to mount the Amiga 1200 motherboard, so I had to remove it. This means that the CD-ROM Drive is held entirely by the right side of the case. This isn't that bad, though, as there are 4 screw mounts on that side and there is also a slight shelf for the CD-ROM drive to sit on. With all 4 screws mounted, the drive is solid and isn't really going anywhere. Additionally, the CD-ROM drive face sticks out quite a bit, and actually rests on the molded plastic of the front of the case, which is screwed into a metal plate.
I spent a little bit of time playing origami to get the ribbon cable properly laid in the case. By pressing tightly with my thumb at the folds, I could get it to lay down stiffly in the case.
I also lopped off all the excess and unused ports on my spare PSU that I'm using for the project, because they contributed a significant amount of clutter in the case. I coated the tips of these cuts in hot glue to prevent accidental shorting.
I want to have two floppy drives - the first an actual Amiga floppy drive, and the second a Gotek Floppy Drive emulator, but i only have one 2.5" IDE port and cable. Luckily, a few years ago, I picked up this hacked up cable from a guy on AmiBay. It plugs into the floppy drive port on the back of the Amiga and outputs to a standard 2.5" IDE cable and power connection.
I have the cable permanently installed into the floppy port under the CD-ROM drive. Again, hot glue on exposed terminals to prevent shorting.
In the front of the case, I managed to install the Amiga LED plate in the exact spot where a window existed for a Turbo Speed LCD Display prior. The case would hook up to old motherboards with turbo buttons on them and output the speed of the 286 or whatever was connected, so the user would know if they were operating at 16 mhz or 66 mhz or whatever.
You can see the 3 LEDs just barely poke in through the window. Tried turning it on and all 3 are clearly visible.
I want to print out a sticker to place over that entire front panel. This is a mock up of what I'm currently playing around with. The boing balls would be stickers to place on top of the reset buttons, while the white squares would be cut out to align with the LED spots on the window. I need to make sure the measurements are correct, but feedback is welcome.
I went ahead and installed a modern SATA HDD with just some L-brackets to mount it to the case. This will make attaching the HDD to a modern PC easier for me (as I have a SATA->USB adapter) which will let me use WinUAE to easily partition and install stuff on the HDD.
I'm using a SATA->PATA adapter for this. I haven't actually tested to see if it works with the Amiga, but I assume it should. I've used it in retro 486 PCs before without issue. If anybody knows if this is going to cause a problem, please speak up. I don't want to use CF kits unfortunately. This is being fed into a quad-buffered IDE interface I posted earlier. Before, I had tested it out with a 8 gb PATA drive and got it recognized under workbench, so I'm hoping for no problems with this SATA->PATA HDD.
Got the Floppy Drive and the Gotek Floppy Drive emulator installed. They go into a cage that you screw into the case. The left half of the cage is held by a metal bar that spans the width of the PC case, giving additional support to the top of the case (which is strong enough to hold a CRT monitor). The cage screws into the top of this metal bar. The other side of the cage was supposed to screw into that riveted bracked I removed earlier. However, to an even greater degree than the CD-ROM Drive, both the gotek floppy drive emulator and the real floppy drive stick way out of the front of the case, resting on both the plastic and the metal. And I've tried putting everything in the other way around and it's the same way. It seems the drives are supposed to actually stick out this much on this case, which is fine as it provides a ton of stability and support to the floppy drive. Overall, all the drives in the case are firmly mounted and not moving, despite removing that bracket.
The wiring is still pretty clean. I'm playing around with bracket locations on the back to see what kind of configuration I like best. I'm still waiting for a parallel cable and a 25pin serial cable to arrive for me to mount. Ultimately, I think I will forgo putting the mediator in as there is no real need anymore. I was planning on using flex PCI risers to work with the mediator, but my main reason for getting a mediator was to install a soundblaster card with. However, I have a prisma megamix music card coming in which accomplishes the same goal I was going for -- MP3 playback, that I don't feel the need anymore.
I also am waiting on a second angle adapter for my PCMCIA port so I can install the wireless adapter. But, unfortunately, both the prisma music card and the angle adapter are in the mail and thus I'm pretty much at a stand still.
EDIT: Regarding the large white bay in the front:
I have decided that I am going to mount the controller ports to the front of that bay on one side, and then on the other I want to put an Amiga logo sticker.
Since virtually everybody thinks the post-death logo is trash, how about this one instead:
BTW sorry if some of the photos are blurry. Phone-hands.
Looking great, good choice on the sticker. As far as I know the SATA->PATA should work.
What are you going to do for the keyboard?
What are you going to do for the keyboard?
OP
OP

I'm gonna try and rub off the windows logo on those keys and hand paint an amiga logo on them instead lol.